A stove in a bathhouse is a mandatory attribute, since it is she who is responsible for heating and subsequent maintenance of temperature. At the same time, there are a number of factory products or structures made of bricks that meet the necessary requirements as much as possible. However, drawings of homemade metal bath stoves, which make it possible to make a small device that is ideally suited for specific conditions, are especially popular.
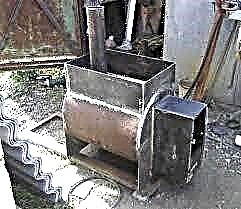
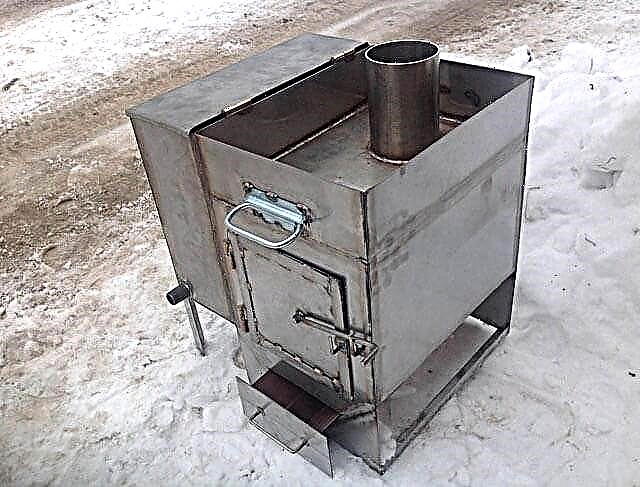
Amateur photo of the simplest home-made metal stove
Manufacturing process
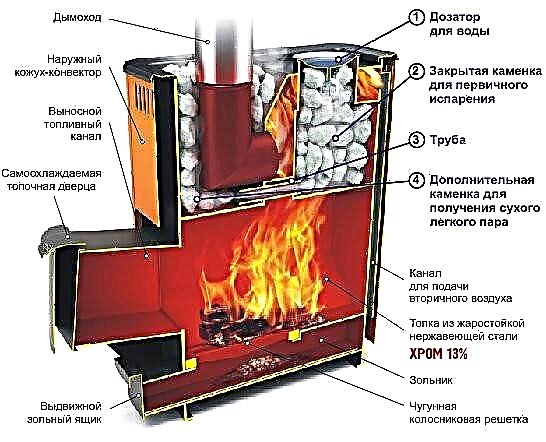
To begin with, it must be said that there are a number of similar products that differ in their design and principle of operation. Therefore, the drawings of stoves for baths made of metal are different. However, all of them have approximately the same principle of operation (see also the article “A furnace for a bath from a pipe: manufacturing tips”).

The simplest drawing of a sauna stove
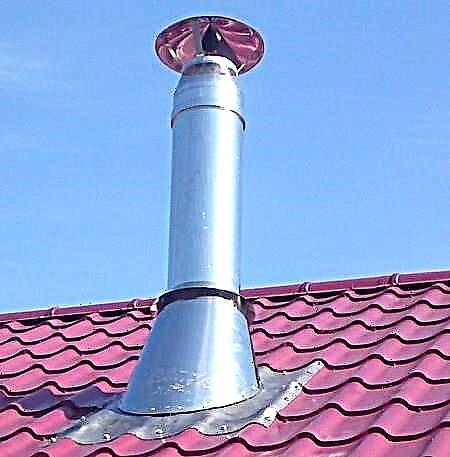
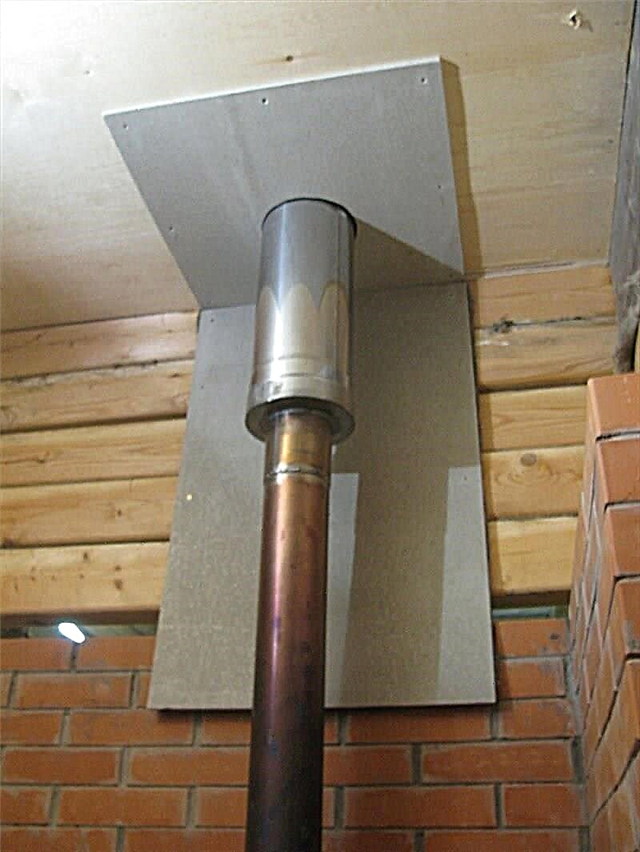
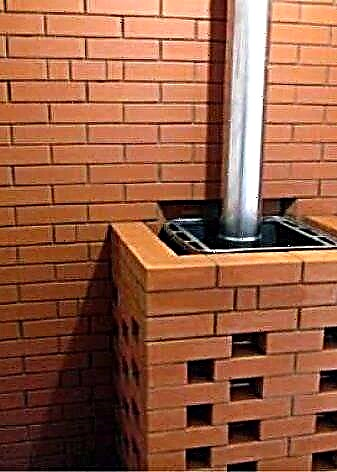
When creating a drawing of a stove for a bath made of metal, special attention is paid to the chimney, namely the places where it will pass through the roof. The fact is that the pipes at the furnace have a rather high temperature and in order to avoid fire they need to be additionally insulated. They must also be located at a certain height to create a constant traction.

Proper organization of the chimney
Creating stoves with their own hands, many craftsmen advise to purchase finished products that are made specifically for these purposes to organize such passages. At the same time, they are quite often produced in the form of an integral complex with an outer tube and fungus.
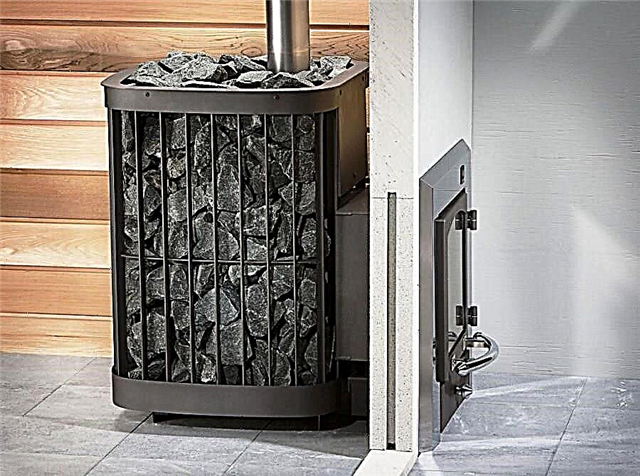
You also need to think about a protective screen, whose task is to prevent the effects of high temperature on the walls of wood. They are best created with a reflective surface in order to remove infrared radiation. These products are often sold ready-made and have a relatively low cost.
Factory products for organizing smoke removal have a good appearance and do their job well
Output
In the video presented in this article, you will find additional information on this topic. Also, based on the text presented above, we can conclude that the principle of manufacturing furnaces from metal is quite a post. At the same time, there are many different designs that have their own specific features and characteristics (see also the article “Drawings of a metal furnace for a bathhouse with your own hands: how to build a heater in a steam room with high efficiency”).
Special attention should be paid to some factory products, which are presented in the form of doors, chimneys and grilles. They will greatly facilitate the manufacturing process, which means that it is on their basis that drawings should be developed.
Description of the furnace for a metal bath and its main characteristics

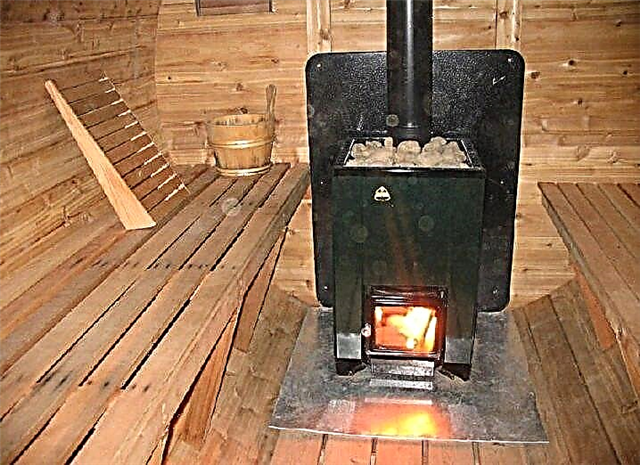
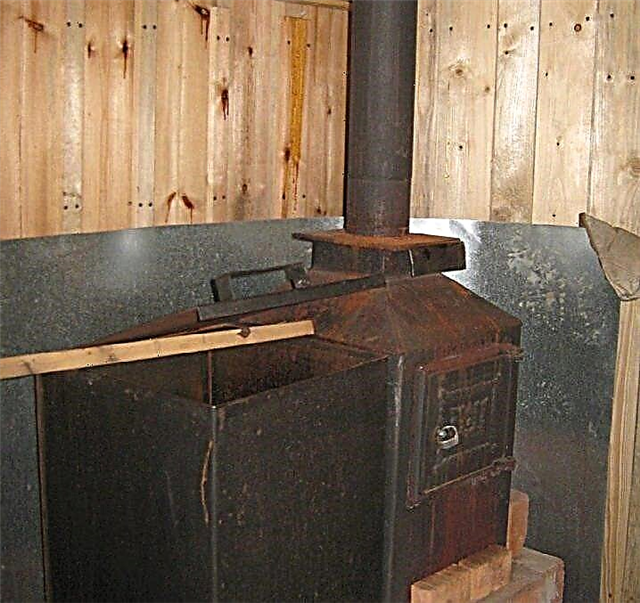
You can, of course, buy a metal stove in the bathhouse. However, the best option would be to make it with your own hands. A simple option is a potbelly stove, which is a metal structure equipped with a door and a pipe. The low heat transfer and significant financial costs for the purchase of fuel do not allow the efficient use of the heating installation, so it can be seen in rare cases.
Another thing is modern iron stoves. Their attractiveness, high efficiency and the highest fire safety rating are impressive. They are made of sheet iron with a thickness of more than 0.4 centimeters. The structural components are:
- for filling and storing stones, it is customary to use a heat chamber,
- there is a tank designed to store water with a volume of 30-70 liters.
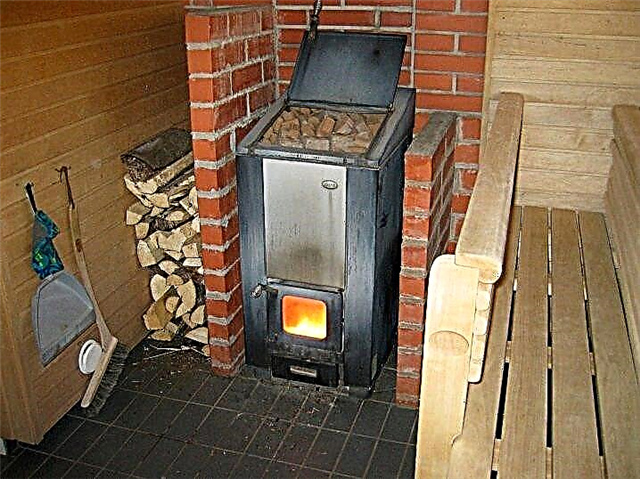
An iron bath stove requires lining with refractory bricks.This makes it possible to evenly warm the air in the room and makes the design completely safe for operation.
Do-it-yourself ways of manufacturing an iron furnace in a bathhouse

One of the most affordable and common options for stoves in the bath is considered to be:
- with three compartments and a vertical boiler,
- with a horizontal firebox mounted in the steam room,
- with a heater and a firebox door installed in the dressing room,
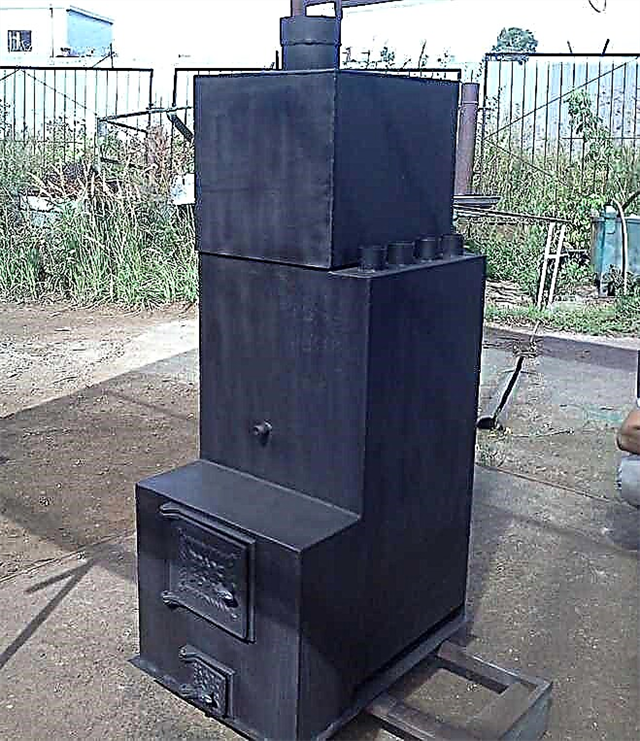
- in the shape of a boot, with a heater mounted in the chimney, a stainless water tank,
- device lined with fireclay bricks inside, red outside.
Moreover, facing with heat-resistant facing brick is needed to maintain the temperature in the steam room at the level of 70 degrees. The walls of the structure are not heated significantly. Due to the high temperature, the filler of the heater is heated. A significant temperature is kept in the chimney, which makes the design very fire hazard. It is possible to reduce the danger by arranging a stove or water tank around the chimney.

You can overlay the unit from the outside, but the iron walls will quickly burn out. In order to significantly increase the operational life of a structure, it is necessary to take sufficiently thick iron to produce the desired structure, or to clad the installation so that there is sufficient free space between the base and the brick.
Crippling human health, preventing burns to the skin, minimizing the possibility of fire of wooden structures, the stove structure in the bathhouse from three sides is covered with refractory bricks or a frame made of thin alloy steel is equipped. Holes made in the frame contribute to improved air exchange.
Positive and negative qualities of heating units installed in the bath
A homemade stove for a bath made of metal is endowed not only with positive qualities, but also with negative ones. The main ones are:
| Small size | It does not have a real opportunity to accumulate a lot of thermal energy, therefore it cools down for too short a period of time |
| Significant heating rate | Will not be able to heat a large room |
| Able to maintain room temperature at a proper level | To ensure fire safety, there is a need to equip the housing with additional casing |
| The possibility of using improvised materials | |
| Low manufacturing costs | |
| Significant thermal conductivity | |
| Easy installation | |
| Won't take much free time | |
| It is not worth spending significant effort and money to build a high-strength base |

Simplicity of installation work and low costs are important components for everyone who has decided to makedo-it-yourself bath stovegland. The ability to read correctlyblueprintsnecessary. Non-observance of the technological process, poor quality of the materials used, improper or irrational use of the bath structure can contribute to the occurrence of a fire source.
The main list of materials and auxiliary tools that you will need to create a stove in the bathhouse with your own hands
If you decisively decided that you need to build a sauna stove with your own hands from metal, then first you need to make a drawing of the stove, where the configuration and design parameters, as well as its components, will be determined. Moreover, the drawing of the stove can be drawn both independently and find the necessary option on the Internet.
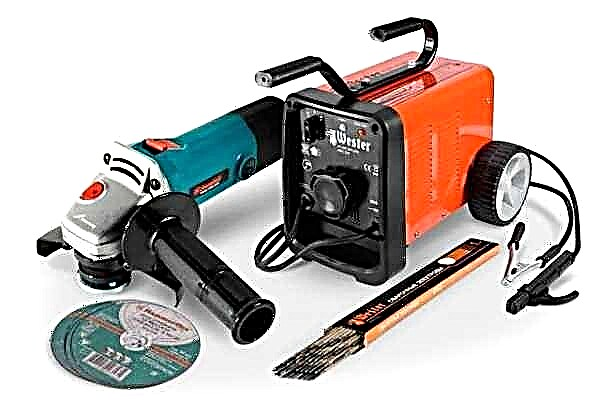
To get started, you need to purchase the following tools:
- The grinder.
- Welding machine.
- Electrodes of 3 or 4 mm diameter.

In addition to the above, you must have in stock:
- Iron sheet with a thickness of 2 or 3 millimeters.
- A pipe with a diameter of 100 - 150 millimeters.
- Wheel rims in the amount of 4 pieces.
- Iron reinforcement of 8 or 10-millimeter diameter (can be replaced with a metal bar).
To create a heating installation in an iron bath, you will need such building material:
- Sand and gravel - about 0.1 cubic meters.
- High-quality cement - 3 bags of 50 kg each.
- The brick is red - about 350 pieces.

It should be noted that a warm air stream is drawn out by a discharged cold stream. Moreover, warm air rises from the bottom up. Traction is affected by weather conditions: in summer, due to warm and humid air, traction is less. In winter, when it is frosty outside, traction is stronger. Pipe diameter also affects traction. With a small diameter pipe, warm air will rub against its walls, which will lead to significant braking and the inability to quickly escape from the chimney. The result may be the creation of a smoke plug, which will lead to smoke in the room itself.
Experts recommend that before starting the construction in the bathhouse of an iron furnace structure, it is necessary to study the principles of pressure, draft, determine the diameter of the chimney and furnace. Too wide a pipe will slow the exit of gas and smoke to the outside, which will lead to clogging and the need to constantly clean it. The optimum speed of smoke exit from the chimney is from 5 to 8 m / s.
We equip the foundation for a do-it-yourself metal bath stove

If materials and tools are available, you can proceed with the construction of the structure. First you need to mount the base, on which the structure is subsequently installed. Despite the small weight and small dimensions, the arrangement of the foundation is a prerequisite for the safe location of such a unit in the steam room. It should be borne in mind that the weight of the new unit will be about 8 tons, and after a while, after drying, its weight will be reduced by half.

The question arises: "What depth is necessary to make the foundation?" This indicator is influenced by many factors:
- soil strength and heaving,
- soil freezing depth,
- the depth of the foundation of the steam room itself,
- the presence of groundwater and the depth of their occurrence,
- at what stage of construction is the bathhouse itself.
If the soil is sandy or dry, then it is worth deepening the foundation by 0.8m. With heaving soils, it is worth making a deepening below the level of freezing of the soil (as a rule, 1.5 m deep).


When installing for a stove in a bathhouse of any kind, even if ultralight thin steel is used in its manufacture, a base is required. The foundation must be flat so that the structure does not turn out to be skewed.

When installing a device made of sheet steel, whose weight is at least 150 kg, the construction of the foundation is reduced to the following actions:
- first you need to dig a pit, fill up the bottom with rubble and ram it with high quality,
- a cement mortar consisting of sand (4 parts), cement (1 part), water is poured on top of the compacted crushed stone until an average consistency is obtained. Leaves to harden for 24 hours. A so-called sole is formed,
- to enhance the waterproofing, completely ruberoid sections are laid on a completely frozen cement mortar,
- after the foundation pit is filled with concrete mortar consisting of fine gravel (4 parts), cement (1 part), sand (2.5 parts), water (by eye),
- Using the construction level, the horizontal position of the foundation is clearly defined.
It is advisable not to operate the foundation for a couple of weeks, so that the cement mortar completely solidifies.
We build a sauna stove based on an old cylinder

The stages of work are as follows:
- We select the desired key and unscrew the balloon valve.
- To avoid an explosion, we fill the cylinder to the brim with water so that the remaining gas is displaced.
- We find the seam on the cylinder in the upper part and cut off the top using the grinder.
- In the cut part, we make the holes necessary for installing the door.
- In the case we make a hole for connecting the pipe to the chimney.
- We weld to the cylinder the corners on which the grates will be installed, welded from metal bars.
- The cut off upper part of the cylinder, by welding, is fastened back to the place from which it was cut.
- We attach hinges for the door to the sashes, as well as locks.
- We take a pipe with a diameter of 40 mm, from it we cut out the legs, which are mounted in the lower part of the body.
- We fix the pipe for the chimney.
- In order for the previous layer of paint to completely burn out, it is necessary to take the structure out to the open air, melt the fire and calcine it well.
- After the cylinder is degreased, then painted. How to color the stove? It is best to use heat-resistant enamel. After painting, the structure dries well.
- The last step is the installation of the bath heating structure on the equipped foundation.
We use an iron pipe for the manufacture of metal structures


For work, you need a pipe with a diameter of 530 mm. Take the following steps:
- First you need to cut the bottom, cover, compartment walls 0.5 cm thick.
- After the edges of the pipe are prepared.
- Taking into account the diameter of the pipe, grates are welded.
- Holes are made in the amount of three pieces: for the hatch where the stones will be loaded, for the furnace door and the ash pan.
- In the partitions we make round holes, we fasten them in the pipe to make the structure divided into separate sections.
- One part of the loop is attached to the upper edge of the pipe where the water will be. The other part of the hinge is attached to the cover. The faucet is mounted at the bottom of the tank.
- We weld canopies for doors to pre-made holes.
- We install a pipe for the chimney.
After the construction installed on the foundation, it is necessary to overlay it with red ceramic brick. Do not forget about the small gap between the metal walls and brickwork. To conveniently open the door of the furnace, leave a window in the masonry. Thanks to them, it will be possible to adjust the temperature in the steam room. In the process of bricklaying, fireclay cement should be used. The brick is laid on the edge. The thickness of the masonry directly depends on the parameters of the rib.
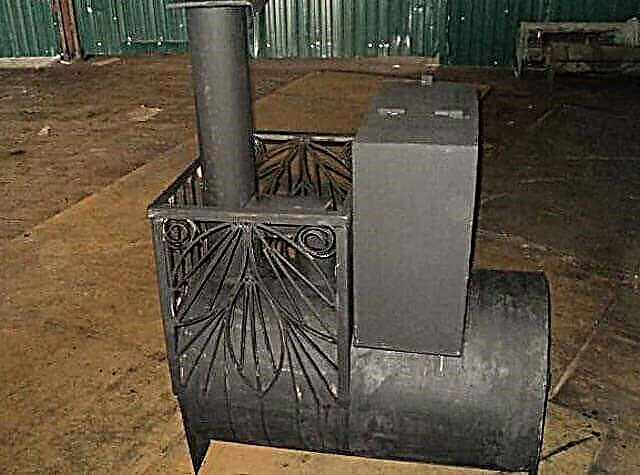
Boot stove

In its finished form, the structure is quite bulky and heavy, so experts recommend that its main parts be manufactured separately, and then folded like a designer on a foundation that is pre-mounted. It should be borne in mind that using a grinder, hacksaw or cutter, it will not work to make perfectly even edges. Therefore, it is advisable to resort to the help of a special tool - the guillotine.
The furnace design consists of four sections resembling metal boxes of a perfect geometric shape. The furnace (sections No. 1) is connected to the chimney (section No. 2) by means of a mounting mechanism. The heater (section No. 3) is installed in the chimney. A water tank (section No. 4) made of alloy steel is installed in front of the second box.
We begin to manufacture a metal structure:
- We mark the blanks on the metal.
- We cut the workpieces with the necessary parameters using the guillotine.
- We fold the walls of the boxes and sign, so as not to go astray.

- We take the parts of the sections and weld them a little to the bottom wall.
- Using a grinder, we cut a hole in one wall through which steam will escape.
- Another small hole is made above the hole, near which bolts are attached on all sides to which the door is attached. Mounting is done with brass nuts to prevent oxidation.
- Using an asbestos thread, we wrap the door to form a tightness. Thanks to it, soot and soot are removed.
- The second box is taken, 2 - 4 holes are made in it with an indent of 6 cm from the edge. Pipes will be inserted there.

- We take section No. 1 and cut the section for the door and the ash pan from the end.A hole is made in the upper part so that section 2 can be installed. To strengthen the hole, on one side we weld a corner. On the other sides we weld 4-centimeter metal plates.
- We weld the plates to both the external and internal surfaces, retreating a small distance from the edge and leaving a gap for the installation of section No. 2.
- To strengthen the door attachment points, we weld the plates to sections No. 1 and sections No. 3 on each side.
- We make the grill using steel bars. We insert it between the ash pan and the furnace.
- In order to better burn firewood, parallel to the blower we weld grates.
- To strengthen the section number 3, you need to weld to it small scarves of metal.
- We fix the cover with a cutout for the chimney.
- At the place of installation of the pipe, we weld the skirt.
- Section No. 3 is set to section No. 2.
- After complete assembly, all sections are carefully checked, final welding of the structure is carried out. The seams should be of high quality so as not to disperse, and through them carbon monoxide does not go into the room.
Recommendations of specialists for the installation of a bath furnace made of iron
The highlight is the availability of a quality foundation. After it is necessary to take a number of measures aimed at fire safety, which are as follows:
- Install a metal stove from the wall at a distance of at least 100cm.
- In order to avoid the fire of the premises, it is necessary to cover the walls in the immediate vicinity of the structure with foil and heat-insulating material, which will make it possible for the wooden walls to avoid ignition.
- An iron stove suggests the presence of chimney insulation. You can resort to using sandwich pipes.
- It is imperative to build a brick sarcophagus on top of an iron stove. Its appearance will improve, safety from possible burns when it touches the hot metal walls of the furnace will increase.
Conclusion

Without a furnace, the bath becomes inferior and meaningless. Only thanks to a properly mounted metal sauna stove can you quickly warm up the steam room and create high-quality steam, so necessary for a good time in the bath and improve the physical condition of a person.
There is no need to purchase metal structures in specialized stores. If you have little experience, having acquired the necessary materials and tools, you can make a high-quality iron bath stove with your own hands, which in its characteristics and aesthetic qualities will not be inferior to foreign analogues.
Briefly about the requirements
When embarking on a particular project, it is important to remember that the main thing is your own safety. That is why there are very specific requirements for garage stoves - from metal, a gas cylinder, and indeed from any material - ignoring them entails an equally specific threat to your life
Collected the main ones - remember:
- when arranging the chimney, take care of the tightness of its channel,
- place the stove at a considerable distance from flammable objects and liquids,
- do not use suspicious substances as fuel, as the fumes emitted during combustion can be harmful to your health,
- the exhaust valve must be at least 10 cm in diameter,
- the recommended dimensions for standard potbelly stoves are 70x50x35 cm, while the volume of the structure should not exceed 12 liters.
Production Examples
Having decided to make a furnace for the bath on your own, you need to get to the point thoroughly. First, choose the project that is best for the bath, and secondly, make drawings to make it easier to build. There are many options for bath stoves, so any person can create their own version, given some basics.

Here are some examples of homemade products.
Metal with a tight-fitting heater
This option is possible for a steam room with a size of 2 by 3 and a height of 2.3 meters. The material, namely metal, is taken as a sheet, three millimeters thick. Air supply goes to the top of the furnace. A metal plate is welded to the back wall of such a furnace, and air is supplied through the tubes into the hole between the furnace wall and this plate. This helps cool the back wall and blow up hot air where the flue gases are concentrated. When mixed, the substances ignite. Thanks to this, stones are heated to high temperatures, although firewood is much less.
For compact steam room
It’s not difficult to build such a furnace. For its construction, you will need a metal sheet up to five millimeters thick. If you take a thinner sheet, the stove will quickly burn out. Its dimensions are 90 cm in length, 80 cm in height and 60 cm in width. To create a chimney, a piece of pipe with a diameter of 11.5 cm is suitable. An ashpit with a door should be at the bottom, between this part of the stove and the furnace there are iron grates and stoves for the removal of waste left after combustion. To do this, one third of the back wall of the heater is welded with a strong sheet of metal, where a pipe for flue pipe is welded in the center, lowered down by 10-12 centimeters.
The furnace is covered with a lid of metal up to one millimeter thick. It is it that does not allow the stones to cool, and also does not allow waste and ash to enter the steam room. The lid opens only when necessary, namely before going to the bathhouse.
Simple heater
This is the best home-made stove, which is suitable for both a sauna and a simple bathhouse. High temperature is reached in about an hour and a half. During this time, 50 liters of water needed for bathing can boil. Such a stove has not one chimney, but two. The first is suitable for heating the room. The second is for the release of carbon monoxide and caustic smoke. The design consists of sheets of iron 3-4 mm thick, but the firebox itself is made later. They make it of metal up to 6 millimeters thick. Also included are small and large gate valves and two metal grilles.
The heater is made of steel up to three millimeters, which is mounted on the “neck” of the firebox itself. Two pipes are placed on top, to which flanges are welded with the necessary holes for fixing the outlet pipe and for fixing the elbow.
With brickwork
In this embodiment, dual technology is used, that is, brickwork plus a metal casing. Steel up to two millimeters is suitable here, and the brick should be heat-resistant.
First, a base is made to which the legs are welded, which are necessary for the stability of the structure. Then they lay out a row of bricks. The remaining rows are built near the firebox in half a brick. Set the grate and grate for stones. It is also necessary to install a window for the valve, where heat will remain after the end of the furnace. The last two rows are made solid, leaving only a place with a window for the chimney.

After finishing the brickwork and waiting until it hardens, you can begin to weld the body of metal, which plays the role of a case. It is necessary to cut metal under the ash pan and loading windows. A door is installed, always with a seal. The metal base is complemented by a cold grip.
The last one is a lid with a hole for the chimney. When the oven is installed in the space allotted for it, stones can be laid. Their bookmark plays an important role. Indeed, work efficiency also depends on this. It is better to take stones of a round shape and different sizes from about 50 to 100 kilograms.

Having examined the types and designs of home-made stoves for a bath, we can confidently say that making it with your own hands is a doable job, if all its safety requirements are taken into account when installing it. This will save money for the family, and the stove itself will become the property and pride of the owner.
In the next video you will see how to make a stove for a bathhouse with your own hands from a pipe.
Pros and cons of metal stoves for a bath
A do-it-yourself metal stove for a bathhouse is becoming more and more popular, gradually replacing traditional brick products. Iron heating bath devices are widely used in our country. Their benefits include:
- Quick heating of the steam room, which is 1.5 hours. Metal gives more heat than stone or brick.
- No chance of carbon monoxide poisoning. A metal bath stove draws all the combustion products into the chimney.
- If you melt the bath with raw wood, there is no chance of smoke.
- The metal stove is very compact, therefore ideal for small baths.
- Judging by the drawings and diagrams of furnaces from such a material, you can make sure that it is very easily manufactured, and the costs for it are very small.
- The furnace in the bath can last a very long time, but it depends on the quality of welding and the thickness of the metal.
The disadvantages of iron furnaces include:
- Cooling too fast, so you have to heat it all the time.
- The walls of the metal stove heat up very much, and closely located objects can catch fire.
- Due to its small size, it is not suitable for use in large baths.
DIY sauna stove design
Prefabricated bath stoves are very different from each other in their design, not to mention do-it-yourself stoves. They can be of any shape and are made of various materials, for example, steel sheets, barrels, pipes. A do-it-yourself bath stove can be made this way: in one room there is a firebox, and in another there is a stove.
Mostly metal structures consist of firebox, stove and water tank .
The combustion process takes place in the furnace, therefore a door is made through which firewood will be loaded, and air hole - blew. Ash is removed through a special grate - an ash pan.
From the furnace, hot air enters the heater, which is filled with stones. To ensure optimal heat transfer, the stones are placed on the grate connecting the firebox and the heater. For spraying stones with water, on the side of the stove make a special door. Then hot air rises to the water tank. Water is poured into the tank through the top, and to drain it, a tap is welded at the bottom of the tank.
What are metal bath stoves made of?
Necessary materials and details:
- Steel sheet having a thickness of 8 mm.
- A metal pipe 5–10 mm thick.
- Square 10x10 mm.
- Doors for firebox, blower and heater.
- Chimney.
- Grate.
- Tap water.
Necessary working tools:
- Bulgarian,
- scissors for metal,
- welding machine,
- measuring tool.
Making a furnace furnace for a metal bath
Many drawings of metal bath stoves with their own hands involve the use of ready-made elements. It can be grates and doors. These elements are chosen, because cast iron products are fixed in a different way.
To make a firebox, metal pipe needed about 2 meters long, the walls of which should have a thickness of 5–10 mm. It is divided into two segments: for the furnace and heater (0.9 m) and for the tank (0.6 m). The remainder will be needed to make a blower and firebox doors.
A hole is made in the pipe for the blower with a width of 0.2 m and a height of 0.5 m. Then a metal plate should be welded over it, onto which stack the grate. Buy it better in the store.
Making a heater
The door of the furnace furnace should have dimensions of 20x25 cm. Rods are welded above it for a heater. Since the heater weighs a lot, the welded rods or square should have a size of at least 10 mm. In this case, the door of the heater should go into the steam room, and the furnace should be located opposite the entrance.
After that, the heater is almost to the top filled with special stones. It can be diabase or talchochlorite. Under the ban stones containing mica. It contributes to the release of carbon monoxide, life-threatening.
Granite is also not advisable to put in the heater because of its large crystals, which begin to crumble under the influence of high temperatures. It is best to use stones with small crystals of small size.
Over the stove, weld metal chimney cover. After that, a water tank is installed, although in many saunas it is not required.
Making a tank for heating water
Drawings of metal stoves with their own hands provide that the location of the water tank will be above the heater. A plate with a thickness of 8 mm is welded above it, in which a hole with a diameter of 150 mm is made for the chimney. Then, a chimney pipe and a pipe blank for the tank are welded to the plate. A hole for the pipe is made next to the rear wall of the structure.
Part of the tank from the side of the chimney is closed with a semicircle made of steel sheet in which chimney hole. which is welded to it. The other part of the tank will be filled with water. For him, they make a special cover with a handle.
When creating drawings of an iron stove for a bath with their own hands, special attention is paid to the chimney, and specifically, to the places of its passage through the roof. This is necessary because during heating the pipe heats up very much and so that it does not catch fire, it should be isolated. To have normal traction, it is placed at a certain height.
Installation of the furnace in the bath
In order to properly install a metal furnace in the bathhouse with your own hands, you must adhere to the following recommendations:
- It should be installed at a distance of 1 m from the walls.
- Place it next to the chimney.
- The structure should be installed on a foundation of refractory materials.
- The wall near which the furnace is installed is covered with a foil with insulation.
After installing the metal furnace, you can brick. which not only gives it a beautiful appearance, but also protects against accidental burns.
Very important detail. If you have made your own metal stove in a bathhouse - do not forget, always the floor under the blower should be made of tin or tile. generally from non-combustible material.
Thus, having a drawing on hand and possessing metal carving skills and experience in handling welding, you can easily make a furnace in the bathhouse with your own hands. It will work even better than the purchased one.
Kamenka and a tank with water
- Above the firebox, it is necessary to make a separate chamber with a door, which will be separated by a grill.
- Special stones will interfere with it for long-term maintenance of temperature.
- At the same time, the drawings of the metal sauna stove are recommended to make a closing window, which can be used to supply water and create steam.
- It should be noted that ordinary stones are not suitable for such furnaces. This is especially true for material containing silicon or other inclusions.
- The top of this compartment is made with a hole for the pipe. It will remove smoke, and at the same time heat water.
- The liquid tank is installed on top. In this case, the drawings of the stoves for the metal bath are advised that the chimney passes through its middle. So the water will be heated both from the chimney and from the upper surface of the sauna heater.
- Professional craftsmen recommend installing a crane on the bottom of such a tank. In this case, you need to purchase special devices, the price of which can be high, but they will be able to work for a long time in a constant temperature drop.
Particular attention is paid to the lid of the container. It can be made of wood, but then you need to protect the area of contact with the chimney. At the same time, the installation instructions advise making small slots in it for free steam output.
Advice! A similar design is usually made of a thick-walled pipe.This helps to resolve the issue of cheap materials, since such products can be found at recycling points at a reasonable cost.
When creating a drawing of a stove for a bath made of metal, special attention is paid to the chimney, namely the places where it will pass through the roof. The fact is that the pipes at the furnace have a rather high temperature and in order to avoid fire they need to be additionally insulated. They must also be located at a certain height to create a constant traction.
Creating stoves with their own hands, many craftsmen advise to purchase finished products that are made specifically for these purposes to organize such passages. At the same time, they are quite often produced in the form of an integral complex with an outer tube and fungus.
You also need to think about a protective screen, whose task is to prevent the effects of high temperature on the walls of wood. They are best created with a reflective surface in order to remove infrared radiation. These products are often sold ready-made and have a relatively low cost.
Factory products for organizing smoke removal have a good appearance and do their job perfectly.
In the video presented in this article, you will find additional information on this topic. Also, based on the text presented above, we can conclude that the principle of manufacturing furnaces from metal is quite a post.
At the same time, there are many different designs that have their own specific features and characteristics (see also the article “Drawings of a metal furnace for a bathhouse with your own hands: how to build a heater in a steam room with high efficiency”).
Special attention should be paid to some factory products, which are presented in the form of doors, chimneys and grilles. They will greatly facilitate the manufacturing process, which means that it is on their basis that drawings should be developed.
Drawings of a metal sauna stove - we build our own stove
Now the bath has become not only a place where you can wash, here visitors receive wellness treatments that heal the body and soul. Often lovers of steam in their own bath house prefer to assemble a heating unit for it with their own hands. To do this, they may need drawings of the stove for the bath.
Use of metal stoves
For many years, metal furnaces have been competing with traditional heating structures made of bricks. They are installed both in private households and in bath houses.
The demand for metal aggregates is explained by the presence of important advantages:
- heating for a short time,
- affordable cost
- high thermal conductivity
- there is no need to build a high-strength foundation,
- simple installation process.
The latter advantage is especially important for those who plan to make such a device on their own. But for this you need to be able to read the drawings of the sauna stove made of metal. You should also know that in the case of irrational use of such a unit or non-compliance with the technology of its manufacture, a fire is likely.
Design features of modern metal furnaces
The simplest example of the design of sauna stoves made of metal with their own hands is considered to be a potbelly stove. It consists of a drawer equipped with a pipe and door. Its main drawback is its low heat transfer at high fuel consumption. Therefore, now they use a potbelly stove extremely rarely.
Modern metal units have a higher fire safety class. They are made of sheet material, the thickness of which does not exceed 4-5 millimeters.
Often their structural solution provides for the possibility of arranging an additional water tank with a volume of up to 70 liters.
In order to ensure uniform heating of the air in the unit and reduce its fire hazard, the lining is made of refractory bricks. In the absence of the need to create a particularly strong foundation for the furnace, it will be sufficient to have a large-sized base, which can be a cement slab with a coating of tile, either a metal sheet or refractory brick.
How to make a stove for a bath with your own hands - details from the master

Currently, there are many metal stoves for the bath on the market, but they are all not cheap. If you have good experience in welding metal, then you can make an iron stove in a bathhouse with your own hands. In this article, we will describe in detail, attaching appropriate photos, how to do this, having our sizes and drawings.
Differences between metal stoves for baths and saunas
Steam rooms in the bath and sauna are significantly different. The sauna is accompanied by a high temperature - over 85 ºС.
Such indicators make it impossible to greatly increase humidity, as well as inevitably getting skin burns. In this case, the broom under such conditions crumbles in just 5 minutes. Therefore, the humidity is adjusted to 5-15%.
The Russian bath is characterized by a temperature in the region of 55-65 ºС, which makes it possible to raise the relative humidity to 50-60%.
To create certain conditions in the steam room, different furnaces are used, and different approaches to their installation are also used. If a sauna is being equipped, then it will be necessary to observe the maximum contact area of the furnace body with air and to ensure fast circulation of air flows along the walls.
It all comes down to heating the air in the steam room as soon as possible. A small open heater, located above the firebox, is able to warm the stones up to 200-250 ºС. It makes it possible to get a little steam - as a rule, this is enough for the sauna, because you need to achieve only 15% humidity.
DIY Russian-made stoves
The most important thing when making metal stoves for a bathhouse with your own hands according to the drawings is to take into account that it is impossible to maintain the desired temperature within 60-65 ºС with warmed metal walls (read: “Drawings of a bathhouse furnace from metal - we build our own furnace”). You will definitely have to reheat, which is accompanied by the emission of strong infrared waves, in which it is quite difficult to be near the furnace.
There are two methods to solve this problem:
- Lining the furnace. The process consists in lining the firebox from the inside with refractory bricks. It is enough laying on the rib, while the thickness of the lining will be 6 cm, although there is also narrow chamotte, 3 cm thick. Nevertheless, heating of the steel walls is insignificant, the heater warms up most of all. Therefore, you should immediately design the furnace so that it is of increased size, because most of its volume is allocated to the lining. The disadvantage of this method is that as a result, hot smoke is generated, which reduces fire safety. It is best to cool it by installing a tank or heater on the pipe. It’s a little more difficult to install a heating shield, passing through which the smoke cools down to 80-120 ºС.
- Install brick screen around the iron stove for a bath. It is assembled from ceramic brick, while windows are left in the wall for mounting doors, which will allow in the future to control the level of air heating. We can conclude that this option is the best because of the possibility of temperature control, but it is less practical, since the back wall is very hot, so you have to include heat-resistant steel in the design. In this case, it turns out that for a longer service life of the iron bath furnace, you need to choose a rather thick metal. Practice shows that it is better to install it in the upper and lower parts of the furnace.
Separately, it is worth mentioning the seams.Homemade iron stove in the bath quite often begins to burn out from poor-quality seams. In production conditions, this problem is solved using a bent design. On top of the furnace, they try to minimize the number of seams.
What size heater and in which place is better to put
The required volume of stones is determined by the size of the steam room and the quality of insulation. The value, as a rule, varies from 20 to 40 kg per 1 cubic meter of space. Naturally, the more there are, the easier it is to produce the right amount of steam.
Due to the fact that different stones differ in density, with one mass they will occupy different volumes. It was determined that for a steam room having a volume of 12-14 m3, it would be necessary to install a heater 30 × 40 × 30 cm. These sizes can be slightly adjusted in various situations.
Making a bath stove from metal with your own hands, you will need to select the individual volume of the heater, based on the size of the furnace. In order to prevent mistakes, it is better to push off the finished drawings. When using the experimental approach, it is worth considering that the volume of the furnace should exceed that of the heater by approximately 30-50%.
Before you build a stove in the bath, it is worth calculating the best location of the heater in the furnace. From practice it became clear that it is best to place it on top, near the back wall, where the highest temperature.
It is worth remembering that the heater will need to be maintained, and it should be equipped so that water can be supplied there. The hatch is best positioned so that it is possible to easily reach the most distant edge with your hand, and so that water can be supplied without the possibility of a burn.
Drawings of homemade steel bath stoves
Consider the option of the furnace, which will be relevant for a steam room with a volume of 2 × 3 × 2.3 m. For its design, sheets of steel 3 mm thick are used.
To start the combustion process, the design provides an additional duct, which originates from the street. To prevent the steel from bending during heating, stiffeners in the form of corners are piled to the sides at the top of the furnace.
Consider another scheme by which you can make metal bath stoves with your own hands. These are models with air intake from the top of the furnace. They are also called gas-burning furnaces. On the back wall, steel platinum is welded to it. Air enters the furnace from under the grates, and is fed through air ducts going into the gap between this plate and the back wall of the furnace.
Such an interesting design copes with two tasks at the same time: it cools the back wall, preventing it from burning out, and air is also fed to the upper part, where very hot gases in the form of smoke are concentrated. 80% of their volume is combustible.
After mixing with air, they ignite, which leads to an increase in the temperature in the furnace and heating of stones to higher values. If dry firewood is used as fuel, then they will require significantly less.
On this principle of operation, many continuous burning furnaces were built, but for bath stoves it has only recently been used. There is a similar model without afterburning. Having studied her drawing, you can better understand the proportions and placement of different elements.
This design involves the construction of a furnace with a volume of 30% more than a heater. The ratio can be considered acceptable. The chimney is located with an offset back, which sometimes causes difficulties when installing it - the ceiling beam may interfere with it. In this case, it may be necessary to bend the chimney, which is not welcome.
In addition, before you make an oven for a bath, you should decide whether you need a steam tank for heating water. Some adjust the humidity level by opening and closing the tank lid.
Other experts claim that heavy steam is generated in this way, so they advise installing the tank in the washing room, and the water is heated by means of a heat exchanger mounted in the furnace, connected by pipes to the tank.
Now consider a diagram of a metal furnace with a water tank. The design is considered quite well-designed. Thanks to the spark arrester, the smoke travels a slightly greater distance, thereby better warming the walls of the furnace. Instead of a tank, of course, stones can be laid.
It is worth considering the option of installing a tank behind the furnace. The chimney is biased back, passing through the tank. Due to the large height of the tank there will be effective heat transfer, therefore - the chimney will not overheat when exiting it.
Making a furnace for a sauna
The main task of the ovens is to bring the temperature to the required indicators as quickly as possible and keep it at that level. To accelerate this process, fans are used, which, by blowing the walls, accelerate heating.
For this purpose, a convector hood is also intended. The gap between it and the wall of the furnace should be 1.5-2 cm. Through the gap, air is sucked in, which heats up during the movement, while the walls cool.
To make the stove in the bathhouse with your own hands as high quality and practical as possible, its body is made of thick metal, and the casing is made of thin, because it does not undergo overheating.
Necessary materials
In order to start manufacturing a metal sauna stove, you need to prepare not only a project in the form of a drawing of a future design, but also some materials with tools. This will help make the stove error free.
- Metal welding machine,
- Electrodes of size 3 or 4,
- Grinder or grinder,
- Directly the metal itself.
Next, you need to determine the type of metal for the independent construction of a wood-burning bath stove. It is almost impossible to make cast-iron constructions with your own hands, therefore they usually work with steel sheets.
For the manufacture of the furnace, they take ready-made steel pipes, and also make a design from the wheels of the car, but you can use ordinary steel sheets. A round oven is a popular home-made option. You can order a stove for a bath from a master who will make you a quality construction.
Such stoves are additionally protected by a small screen of bricks.
The fact is that iron has a burning, infrared heat that can leave burns on the skin.
A small brick screen solves this problem by making the heat softer and evenly distributing it throughout the room.
Refractory bricks, sand and cement will also be required to erect such protection.
Often metal stoves are made with tanks for heating water. It’s very easy to weld such a thing without turning to specialists for help - this will require iron sheets and a welding machine. Typically, metal furnaces and their tanks are not lined, because virtually no coating can withstand such high temperatures.
But if you want to bring a few bright colors to the bath, then the stove and tank can be painted with special refractory paint, which copes with high temperatures. Usually it is made in white, with the further addition of color - so you can get a unique color.
It is also possible to brick the stove completely, and not just as protection. In itself, such a stove will look great, but it is quite possible to finish it further, for example, for this purpose a special ceramic tile is suitable.
How to weld metal
First of all, when cooking metal, you need to remember safety precautions. It is best to cook metal on the street, in a protective suit and in a mask so as not to spoil your eyesight. In the process, it is best to use electrodes with a diameter of 3 mm - they are more expensive than others, but they are very convenient and simple to use even for a beginner.Next, you need to start setting up the welding machine.
- The electrode must be inserted into a special holder located on one of the welding cables. It needs to be fixed so that it does not hang out,
- A cable with a clamp is connected to the part, a positive charge is applied to it. Negative goes to the electrode. If you cook a stainless steel construction, then the polarity must be reversed, that is, a plus is connected to the electrode,
- Next, you need to light the arc by tapping or striking the part,
- The electrode is tilted slightly towards itself - the angle should be from 30 to 60 degrees,
- Also, the electrode should not touch the metal, the distance should be approximately two millimeters.
At the same time you will have to consider several parameters.
The electrode should move along a clearly defined trajectory, with a certain speed, in order to monitor the dimensions of the weld pool, and also try not to deviate from the direction of the seam.
It is worth remembering that welding “pulls” the metal, so the resulting shape may differ from the idea.
To avoid this trouble, the metal must be fixed and tack-made - these are small transverse seams located a few centimeters apart.
Now you know how to weld a stove with your own hands.
Drawings and process
The general procedure for manufacturing a furnace from metal of various types is no different. The whole technology consists of several important stages.
- Preparation of materials
- Welding,
- Assembly parts
- Design location
- The ultimate fastening of all parts.
Making a metal sauna stove is not so difficult, but it is not recommended for beginners in welding to invent futuristic forms and complex structures - they are not only difficult to cook for an untrained person, but it is also more difficult to care for them later. It is best to take for design and welding the simplest metal furnace with parameters 400 to 650 by 600.
It is advisable to make the firebox square, that is, with its width of 0.5 meters, it is better to take the height of the same size. You don’t need to completely build a stove yourself, you can use ready-made fittings - grate bars and doors made of the same material as the stove itself.
A heater is located above the firebox - its recommended parameters are 340 by 250 by 250 mm. The water tank does not have to be mounted in the furnace, it can be made remote or made a nest in the furnace to install the tank on top of it.
Special attention must be paid to the chimney.
The height of the bottom of the chimney from the heater to the ceiling should be at least a meter, the recommended height is 1.5 m.
The upper part of the chimney can be any - it is important that the top of the chimney is 50 cm above the ridge of the roof.
You can also weld a pipe with your own hands, but there are also ready-made options.
All places where the pipe passes through the roof must be insulated with metal sheets.
The stove itself, like the chimney pipe, should not be in contact with the walls, a gap of at least 10 cm is necessary. The stove should be located strictly opposite the front door, away from the shelves in the steam room. Also, the presence or absence of a protective brick screen must be laid in advance in the drawing - a gap of about ten centimeters wide should be placed between it and the furnace.
From the pipe - round
How to make a stove in a bathhouse from a pipe? Before starting work, a pipe is taken, which is divided into two pieces - 90 and 60 cm. Most will go directly to the stove, and a small one will make a good water tank. The process of the furnace device itself consists of several stages.
- At the bottom of the pipe, a blow-in is cut about 20 cm wide and 5 or 6 high,
- A round plate about 1.2 cm thick is welded over the blower,
- The grate is placed in the cellar, which is mounted on four sides by welded “ears”,
- A place is made in the pipe for the furnace, and a closing mechanism is mounted.Parameters: length about 25, and width - 30 cm,
- A piece of metal 30 x 35 cm is fixed above the furnace door - this will make a heater. From its top to the bottom of the tank should be at least 10 cm. The rear wall of the pipe is completely welded, and in front of the hole is a door measuring 25 by 30 cm,
- A fence bar is welded into the heater, then it is necessary to fill it half with stones,
- At the top of the furnace, a special coupling is mounted with a thickness of 5 to 7 mm and a width of about 50 cm. Half of this coupling is welded to the furnace, and the second half serves as an element of the water tank,
- A circle at least 8 mm thick is welded to the bottom of the tank from below. A hole for a chimney with a diameter of 12 cm or more must be cut in it. The lower part of the pipe is tightly fixed to the bottom of the tank so that water does not flow from it,
- The top of the tank is closed with a steel semicircle in which there is an opening for the pipe. Part of the top should remain open so that water can be poured into it. It’s also necessary to weld a tap below,
- On the chimney pipe at a distance of 30 cm from the tank, a steel platform 30 by 30 cm is mounted for mounting part of the chimney with a valve.
Now the question “how to make a stove out of a pipe” will not cause difficulties.
From disks
A very interesting and unusual idea is the welding of a furnace from ordinary automobile rims for wheels.
Of course, for such work, disks from passenger cars will not work, it is better to take parts from the truck.
- The first step is to make a water tank. To do this, one rim must be attached by welding to another, and a piece of sheet of metal should be installed from below. In this part, it is necessary to cut the connector for the chimney, the fixture of which in the future should be shifted to one side. A metal lid is welded on top with the ability to open it and pour water into the tank,
- Next, you need to take two more disks for the manufacture of the furnace. They are welded together, as a result, a cylinder with a cavity appears. A grid is welded in the middle of the cavity, on which the stones will be placed. A small hole is cut out in front, on which the furnace door is attached,
- Such a stove is recommended to be installed on the foundation. To do this, a pit breaks out, in which a brick base is installed. Then it is poured with a solution of cement with sand,
- Such a furnace requires a furnace base made of artificial stone. A cavity is built for the installation of a blower, in which a grate is mounted. Partially, the furnace is built of bricks, a furnace from disks is installed on top,
- It is recommended that the finished furnace be strengthened with metal channels at an angle to the upper platform of the disk. Then the structure is connected to the bricks of the chimney pipe.
In the case of installing such a furnace in a bath, the main thing is to securely weld all the seams, otherwise smoke will get into the steam room. It is better to treat the furnace with a special anti-corrosion paint - under the constant influence of moisture and steam, an unprotected furnace will begin to rust quickly.
From metal sheets
It will take more time to make such a furnace, because you will definitely have to cut metal. To begin with, it is worth deciding on the dimensions of the furnace and preparing metal sheets with a thickness of at least 1.5 mm.
- All dimensions of the drawing must be redrawn on metal sheets with exact observance of angles - they must be strictly straight (90 degrees),
- All elements are cut using a grinder. Opposite sidewalls should have the most identical parameters,
- Two sidewalls are placed on the rib and fastened with tacks. The procedure is repeated for the two remaining elements. Regularly you need to control the angle - from welding the metal can "go". To make a box, two blanks are put together and tacked by welding,
- The bottom and the lid must be attached to the resulting box. The box is flipped to the horizontal position - a door for the heater is cut in the sidewall,
- In the lower part of the external heater, you need to make holes for the pipes on which the internal heater will be located. Below you need to cut a hole for the furnace.
- In the upper part of the external heater, holes are cut out under the chimney pipe, and then strips of metal about 2 cm wide are welded around the perimeter of the hole,
- A furnace door is welded to the box, and an internal heater is inserted inside.
- The top cover is welded with an opening for the future chimney pipe. You also need to cut a hole to clean the furnace from soot deposits.
It is best to install the finished oven on thick legs made of strong steel, as well as polish the structure well to remove all burrs. The tank for heating water can be placed directly on the furnace itself, or installed on the side. True, in the second case, the water will warm unevenly, and it will have to be constantly mixed.
How to order
Of course, a stove cut and welded with our own hands causes pride in the work done, but not everyone has the time and opportunity to do such work on their own. Then the matter can be turned over to professionals. There are several options for making a sauna stove.
- Order via the Internet a typical stove for a bath, however, you will have to assemble it yourself,
- Contact the workshop where the furnace will be manufactured according to the selected parameters,
- Order an oven with delivery and assembly.
You can also order a stove on specialized sites, which will not only be made to the specified sizes, but also will be pleasant to please the eye with an aesthetic appearance.
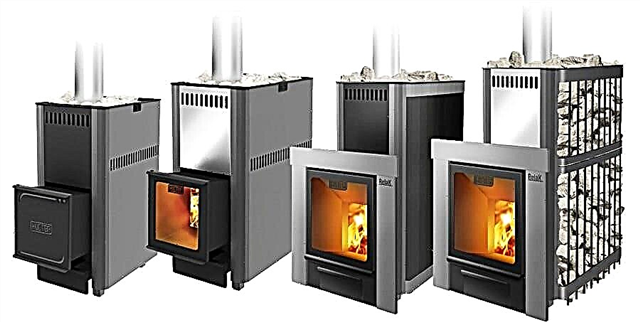
Manufacturers also recommend ordering stoves with a combined type of fuel, so that at the same time it is possible to heat the stove with wood and gas, or electricity - this way the stove will work even in the absence of the main type of fuel. The best thing is to purchase stoves directly from manufacturers - so customers can be sure of the quality of a metal stove for a bath.
Stoves for the bath
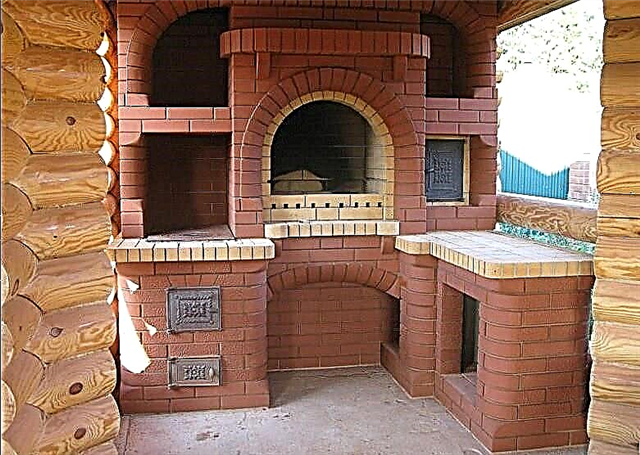
Having your own bathhouse is probably one of the common desires of people. But as you know, the main element of this institution is the stove, which will be discussed in this article.
How to make and install a furnace of constant and periodic heating in small baths? What are the advantages of masonry heater? What are the main requirements for the manufacture of a heater for a bath with your own hands? Look for answers to these and many other questions later in the article.
Varieties of stoves for a bath
A truly good bath is one that has a high degree of heat, and this is impossible to achieve without a good stove. So, bath heaters come in several forms, the main ones are listed in the table.
| Types of stoves for a bath | |
| Electric | Steam ovens have a number of advantages. This and high thermal conductivity, affordable price, compact equipment, etc. This type of heating equipment allows you to create the optimum temperature in the steam room in the minimum amount of time. |
| Wood burning | The traditional option and, moreover, the most popular. Such designs are both metal and brick. The components of such heating devices are: chimney, ash pan, firebox and grate. Wood stoves are characterized by high efficiency. |
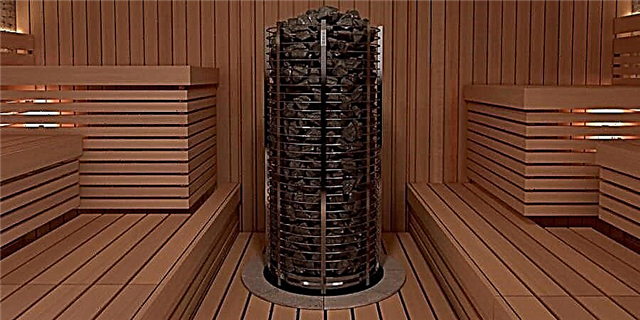
| Finnish | Finnish stoves can be electric or wooden structures, which, thanks to their attractive appearance, can decorate any sauna. Due to a well-designed device, such stoves allow warm air to disperse evenly throughout the steam room. One of the main advantages of Finnish stoves is their high fire resistance. |
| Cast iron | Cast iron stoves are considered to be significantly economical heating equipment for a bath, as they require minimal costs of combustible materials.Such structures are continuous and periodic action and are characterized by high heat resistance. |
Having minimal construction skills, each owner, having made an effort and having purchased the necessary materials, will be able to equip the bathhouse with any type of stove.
Features and advantages of masonry stove
Kamenka is a type of a sauna stove, which has a special compartment for placing stones. In turn, the stones gain heat during fuel combustion, the water heats up and, as a result, steam forms. The most popular today are heaters made of metal and brick, and they both have their pros and cons, which we will consider further.
So, brick heaters have the following advantages:
- durability and practicality of the device,
- the ability to heat large rooms, while retaining heat for a long time,
- ease of installation process,
- decent level of fire safety (due to the presence of a metal base),
- practicality of operation, etc.
In addition to the above advantages, brick heaters also have their drawbacks: they are heavy, require intensive cleaning, long-term heating (more than 5 hours) is required for productivity, etc.
Metal heaters are considered an equally popular heating option. They are characterized by the following features:
- differ in small dimensions,
- compact design
- multifunctional and ergonomic,
- they quickly gain temperature and hold it for a long time.
All heaters are divided into two groups: open and closed. Open ovens allow the use of stones for vaporization; water can be poured onto them. Such steam is not harmful to people, it turns out dry and does not burn the body. In closed structures, stones are located inside, they can also be poured with water, but for this you need to open the doors of the stove. The second type of furnace retains heat much longer than the first.
As for the features of the masonry of the heater, certain skills and compliance with the instructions are required here. Here are some tips to keep in mind:
- the brick structure is best assembled on clay mortar,
- the height of the department for stones should not exceed 7 brick rows,
- it is worth placing the ash pan, blowing, and chimney so that the steam room warms up as quickly as possible,
- When making design calculations, remember, the lower the stones in the stove are, the more productive the source of vaporization is.
Features of a metal furnace
Metal stoves for baths are used quite often: the material heats up quickly, quickly gives off heat, moreover, the structures themselves are light and small. However, such heaters quickly cool down and require a huge amount of solid fuel (firewood).
Many models of metal furnaces have a standard set of structural parts. Due to the presence of grid-irons in such devices, it is practically impossible to regulate the combustion process, therefore it is not possible to control (decrease, add degrees, if necessary) temperature.
Practitioners offer options for improving metal stoves for baths. To do this, the design must be deprived of the grate and the firewood must be burned directly on the base, and in the meantime, holes must be made in the doors for the blower, which will allow you to adjust the amount of penetrating air into the furnace.
Metal pretreatment
After all the individual elements of the furnace are cut out, first release the most heated parts. The side and top parts and the furnace door are heated most of all. Heat them in any way to red and cool slowly. After the holidays, the sheets can warp a little, it's not scary, with a hammer, trim them to their original state. Once again check the sizes, if they have changed within noticeable limits, cut to the desired parameters.This simple method eliminates warping of the stove during its operation.

Blanks for oven doors

Example of a mounted metal door
DIY metal furnace steps
For the manufacture of a metal furnace for a bath with their own hands, amateur craftsmen should do the work in several stages.
Stage 1. Prepare a project with drawings, indicating all the necessary measurements of the parts and their specific position.
Stage 2. Prepare the necessary tools and materials. The integral elements in the working process will be: welding machine, grinder, tape measure, chimney, etc.
Stage 3. This stage can be called preparatory, since it is necessary to mark and clean the area for future construction.
Step 4. A water vessel is made. A hole is provided in the tank for a tap to replace water.
Stage 5. A furnace, heater and blower are created. Install the grate over the blower.
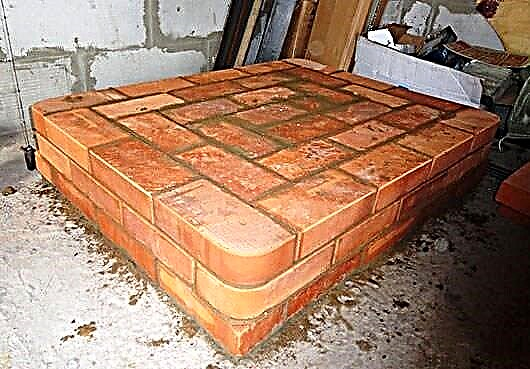
Stage 6. We are working on the foundation for the furnace. It is best to make a brick base. Masonry on the mortar must be done in two rows, this will be quite enough.
It is worth noting that metal furnaces can be different in shapes: curly, horizontal, rectangular, vertical. The most convenient in operation are rectangular designs. This form of heater contributes to uniform heating of the room and maintains heat balance in the steam room.
DIY metal bath stove according to the drawing
 A bath cannot exist without a stove. It is she who heats the room and maintains the optimum temperature. On sale there are a large number of stoves of various models that meet all the requirements. However, the most popular are drawings of metal stoves for a bath with their own hands, according to which it is quite easy to make a device that is ideally suited for specific conditions.
Types of fuel and types of furnaces
Bath appliances differ in the type of fuel used for their operation:
- Wood aggregates. Appeared before other types of metal furnaces. They need a considerable amount of firewood to release thermal energy, and they also need constant care. Usually they are preferred by those visitors to the baths who can wait until the room warms up and then slowly enjoy the aromatic steam and warmth coming from natural wood.
- Electrical devices. In this case, the scheme of the metal bathhouse consists of several main components: a case equipped with a heating element, and special heat-insulating elements.
- Metal gas units. They are considered to be the most modern and reliable structures in operation, they are equipped with a thermostat to adjust power. The safety of gas appliances is ensured by a safety device that instantly trips when the gas supply is turned off or reduced.
Advantages and disadvantages of metal stoves
To understand the characteristics of metal aggregates, you need to analyze their advantages over permanently installed brick structures.
Unlike stoves made of bricks, metal heating units are distinguished by their mobility and compactness and therefore are the optimal solution for small-sized bath houses. The manufacture of a furnace for a bath from a metal can be carried out anywhere and then move it for installation in the desired room.

There are two main structural solutions of metal units:
- Hot type furnaces. These devices are ideally suited for use in bathhouses that are not regularly visited, for example, in a summer cottage. Despite the rapid heating, it is not recommended to equip them in constantly used bath rooms.The fact is that when using such a heating unit, it is possible to overheat the air in the room due to the inability to control the temperature of its heating.
- Cold type furnaces. They are considered the best choice for installation in heated rooms. These units warm up quickly, but unlike the previous version they are equipped with a temperature control system. It is difficult to burn yourself when you touch them, since their walls rarely heat up to more than 50 degrees.
To summarize, the advantages of metal bath units include:
- Small size, which clearly confirms the drawing of a metal furnace for a bath. They are indispensable for small bath houses.
- No need for preliminary construction of a massive base. An arrangement of a lightweight version of the foundation will be sufficient, which allows to accelerate the construction of the bath and its commissioning.
- Affordable price. The metal assembly is distinguished by the simplicity of self-manufacturing, it does not require additional costs. It’s not difficult to find drawings of a metal sauna stove with your own hands. A large number of them can be found in specialized literature and on the Internet.
It should be noted the disadvantages of metal heating structures:
- Inability to accumulate thermal energy and, as a result, rapid cooling. In these devices, the combustion process should be maintained constantly.
- Inability to heat large areas.
- The need to install double walls with an air gap between them. This is required to prevent heat shock while in the bath.
- Fire safety of metal aggregates is lower than that of brick kilns, and therefore, the protection of their lining from the inside should be strengthened.
The value of the shape of the sauna stove
The performance of the unit and how convenient it is in operation depends on this parameter. As practice shows, furnaces having a cylindrical shape and a figured or horizontal design are in high demand.
But the most convenient to operate are rectangular units. The reason for this is the presence of angular zones in them, which rarely glow as much as possible. As a result, there is an opinion that such a frame helps to maintain the shape of the furnace. In addition, the uniformity of heating the unit depends on this parameter.

Proper heating also affects the stability of the metal heating structure. This is confirmed by the fact that the walls of circular and cylindrical furnaces are made reinforced. And although the high degree of stability of the rectangular structure is explained by the presence of cold corners, it still loses its original shape over time.
Varieties of metal furnaces
The resulting empty space is covered with stones by two-thirds, then a chimney is mounted. At the end of the work, a homemade metal bath stove should be covered with a lid. But even taking into account the simplicity of manufacture, such a variant of the unit is one of the most inconvenient to use.
If the bath house has a small area, you can install a compact-size stove-heater in it, using sheet steel for its manufacture. The internal surface of the device is laid out with bricks. The dimensions of such a bathing unit made of metal will be small, and at the same time correspond to the heated area.

It is only necessary to lay the walls of the furnace compartment in a half-brick, and the chimney in a quarter of a brick. Such a heating unit is simple and convenient to operate. For its functioning does not require a lot of fuel, and it warms up quickly enough.
There is another way how you can arrange a stove-stove, but without the use of bricks. This option is not only easy to implement, but also inexpensive. At the same time, the stove has an aesthetic appearance.Such a heating design will warm the dressing room, washing and steam room without any problems.
Self-designing a metal furnace
Stage 1. The metal structure being manufactured will have a closed heater, and in order to use water and get steam, it is necessary to open the door. First prepare the materials and tools. To simplify the manufacturing process, you will need a circuit stove for a bath of metal.
You must have at your disposal:
- steel sheet with a thickness of at least 8 millimeters,
- grate,
- a metal pipe with a diameter of 50-60 centimeters with a wall thickness of about 10 millimeters,
- 10 mm bar
- doors and heck for arranging blowers, heaters and furnaces,
- water tap
- about 2 meters of the pipe, of which 90 centimeters are required for the furnace, 60 for the tank, and 50 centimeters for the manufacture of the necessary parts.
From the tools you need to prepare the welding machine and grinder.

Stage 2. For further work, a long length of pipe is required. First of all, a blower is cut out in it, having parameters of 50x200 millimeters. Above the hole located on the inside of the pipe, you need to weld a fastener designed for the grate. To do this, you need to take a metal plate, which is equipped with eyes. Grid-irons are always available in specialized stores.
Stage 3. Now begin to create a firebox. First, make a hole with parameters of 250x200 millimeters. Top should be welded fasteners, which are required to install the rods of the stove-heater, with a diameter of at least 10 millimeters. They can be exchanged for grate for round units. You can buy such products in the same place.
Stage 4. On the opposite side of the structure, a hole is created. Water is poured into it. Next, stones are placed in the heater. Use, for example, diabase, talchochlorite. Do not use flint, granite and mica stones.
Stage 5. In the cover intended for the heating unit, a hole is created for the installation of the chimney pipe, which is then placed in place. Further it is recommended to additionally install a water tank. To do this, weld the last piece of pipe to the heater and fix the tap in its lower part. During operation of the unit, smoke will begin to move through the pipe and heat the water without bringing it to the boiling point.
Features of the installation process of the bath unit
The installation of the furnace in the bath should be taken care of during the construction of the building. In the place of its future arrangement, it is necessary to lay the foundation, the form of which depends on the choice of the heating structure. Then two rows of bricks are laid on the base and only then the furnace is installed.
In order to increase fire safety when arranging a home-made metal unit, it is necessary to strictly observe the rules for its installation, which are as follows:
- The distance between the wall and the stove should be at least 100 centimeters.
- It is necessary to equip additional protection and for this purpose place a foil having a layer of insulation on the wall closest to the heating structure. These measures allow timely prevention of overheating of wooden elements and their subsequent ignition.
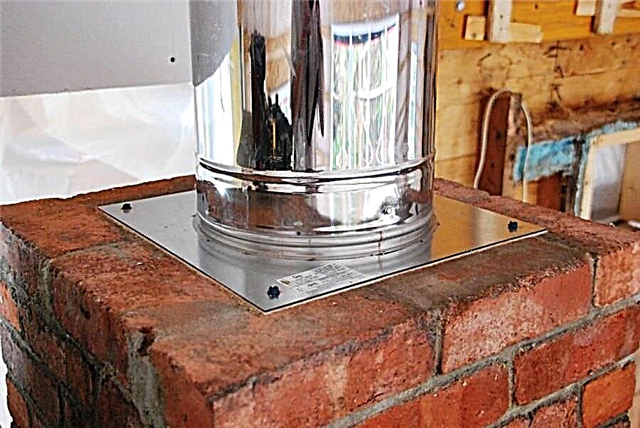
- To isolate the chimney, it is better to make it from a sandwich pipe. It consists of two pipes of different diameters, between which there is a heat-insulating layer.
- When the products of combustion are planned to be discharged through a pipe made of metal, a special passage unit is arranged in the place where the ceiling contacts the chimney.
When the installation process of the unit is completed, it is possible to make a brick finish, which will prevent the possibility of burns and give the appearance aesthetics. In this case, the stove can be placed closer to the wall.
The above design is considered one of the simple to install and convenient to operate.
It should be noted that the manufacture of a heating unit from metal cannot be called too complicated a process. In order to properly complete the assembly and subsequent installation, before starting work, it is advisable to find and view approximate drawings of the iron stoves for the bathhouse with your own hands and choose the most suitable option.
Design features of the furnace of a metal furnace
Most metal stoves produce the maximum amount of heat in the shortest time, firewood burns out very quickly, surfaces heat up to high temperatures. It is impossible to maintain a normal and stable temperature in the steam room - you often have to add firewood. The room is either too hot or cold. Why it happens? Such furnaces in most cases have grates. Their presence is justified in stone stoves, we have already mentioned that these stoves need to be heated quickly. Strong burning of the flame is ensured by a large amount of air entering through the grates into the flame.

Grate metal furnace
Grid-irons are made of metal bars, sheet metal with numerous drilled holes or cast iron, differ in the size of the holes, etc.

Cast iron grate
Firewood is on the grate, the air intake is not regulated by anything, on the contrary, all measures are taken to increase traction, which automatically accelerates the combustion process. Most of all, the upper part of the furnace heats up, slightly less than the sidewalls, and the bottom and front part heat up slightly.

Firewood in the firebox lies on the grate
The scheme of the stove
Sheet metal prices
This mode of combustion is extremely negative for both the duration of the stove and the comfort of staying in the steam room. Fire has to be periodically poured with water, if there is little water - the flame quickly re-ignites, if there is a lot - burning can stop altogether. In short, a bathing day instead of pleasure brings a headache.
What do we offer? The solution is very simple - do not make grate with a blower, let the firewood lie at the bottom of the stove, and not on the grate. Seal the firebox door as much as possible; you can use asbestos cord or mineral wool around the perimeter.

In the firebox door, make holes with an ordinary movable flap to control the amount of air supplied. One bookmark of firewood in such a stove will burn for more than an hour, it is possible to adjust the temperature of heating surfaces. In addition, the entire area of the stove will be warmed up. The furnace manufacturing work was simplified due to the lack of a grate and an ash pan, and the efficiency and ease of use increased.

Furnace furnace without grates

Example of an oven door with an adjustable shutter
As you can see, all the knowledge came in handy, they can be used not only during the manufacture of the stove for the bath. We figured out the theory, it's time to move on to practice.
Design and material selection
For the most part, home-made stoves for the bath are represented by steel and brick models. Of course, there are original designs that use factory parts (for example, cast-iron cast-iron furnaces), but they are more likely an exception, and therefore we will not consider them.
A metal furnace made of steel pipes is the simplest device. For its manufacture, we need a piece of steel pipe or a thick-walled barrel, as well as a welding machine and a grinder.
So, if we like the steel model, we proceed to the work planning:
First you need to decide on the design features
The easiest way is to download online drawings of homemade bath stoves and choose the right option.
However, if necessary, you can design the device yourself, starting from the dimensions of the pipes available to us. It is important to choose the right stove power, which will be approximately equal to half the volume of the furnace (in liters).

The device of the steel model is one of the options
- As a rule, steel pipes with a wall thickness of at least 8-10 mm are used for the manufacture of all billets. To make a standard compact steam room oven, you need about one and a half meters of such a pipe.
- We will also need some gratings and sheet metal. The dimensions of the metal sheet must be determined in advance, since they depend on the dimensions of the individual elements.
- In addition, it is worth buying two sets of hinges and latches for the furnace door and ash box, a tap for a water tank, etc. The price of these parts is low, so you can not worry about exceeding the budget.
When all the materials are purchased, you can start making the construction yourself.
We assemble the blanks in a single design
A homemade stove for a bath from a steel pipe is made according to this algorithm:
- We cut a half-meter pipe segment into two parts - 90 and 60 cm (approximately). Most will be used as a blank for a furnace with a stove, and the smaller part will be used as a water heating tank.
- Next, we begin to process a segment of 90 cm. In the lower part, cut a groove up to 50 mm high and 20-25 cm wide. The resulting hole will work as a blower, providing the furnace with oxygen.

- Above the blower we weld a thick steel plate with a fixed grate. This plate performs the function of the bottom of the furnace.
- We make a furnace hole in the pipe wall. On one edge of the hole we weld the hinges and hang the door - it can be made of the same steel sheet, having previously been bent along the radius of the pipe.
- Next, you need to make a heater - a container in which the heating elements (pebbles, cobblestones, special stones for the bath, etc.) will be placed. As a heater, you can use either a pipe segment or a metal basket welded from reinforcing bars.
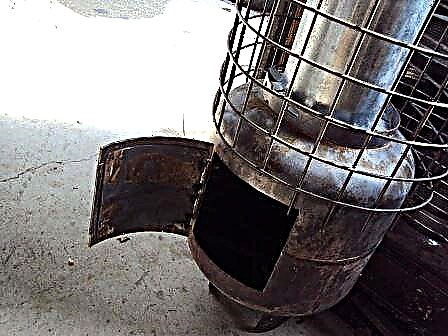
Bar heater
- From a pipe length of 60 cm, we make a tank for heating water. To do this, in the lower part we weld the bottom with a hole for the chimney, and in one of the side walls we install a crane.
- It is better to make the lid on the tank in such a way that at least a third of it remains open: it will be possible to add water without fear of getting burned on the metal.
We weld a firebox with a heater and a tank to each other. For a more durable connection of the parts, steel strips or a metal sheet coupling can be fixed around the perimeter. Pass the chimney through the water tank and weld to the bottom as tight as possible.

Chimney pipes
Installation tips
Homemade iron bath stoves are mounted quite simply.
However, some recommendations are still worth listening to:
- Install the structure in such a way that the firebox opens towards the front door.
- It is worth pouring a concrete foundation up to 30 cm thick into the base of the kiln. It will also not be superfluous to lay two layers of refractory bricks on clay mortar.
- The distance from the edge of the furnace to any vertical surface should not be less than 20 cm.
- To ensure fire safety in a wooden structure, heating structures can be faced with masonry in half a brick. By the way, this will save you from burns!

Instructions for the manufacture of a stove-heater from a metal pipe
To create a metal bath stove with a diameter of 700 mm and a height (together with a tank) of about 1600 mm in artisanal conditions, we will need:
- · Steel sheet with a thickness of more than 10 mm (dimensions not less than 2.2 × 1 meter),
- · A metal pipe with a length of 1600 mm with a wall thickness of 7 to 10 mm,
- · Chimney pipe (arbitrary diameter from 100 mm, wall thickness - about 5 mm),
- · A metal rod about 10 mm thick,
- · Grate (sold in hardware stores, must be steel or cast iron),
- · Loops of 8 pieces and heck 3 pieces,
- · Crane with valve.
The following tools will be minimally required in the work:
- · Bulgarian saw
- · welding machine,
- · Scissors for metal,
- · measuring tool.
Phased Work Plan
1. Cut the pipe into two segments: 0.9 m and 0.7 m.
2. In the lower part of the pipe (under the future furnace, indented from the "bottom" by about 7-10 cm. You can make a blow at the bottom, then it will be easier to remove the ash - you just need to substitute a suitable metal container under the ash hole) do a rectangular hole of 20 × 5 cm is the future blew. Care must be taken to subsequently use the piece obtained when cutting as a door. Above the blower we cut a hole for loading fuel, also trying not to damage the metal.
3. Having welded the hinges and ears for the latches on the outside to the pipe, and the latches on the doors themselves, we install the doors for the blower and for the loading chamber.
4. Cut a circle with a diameter of 0.7 meters from a metal sheet, and in its middle a hole the size of an acquired grate. If you can’t get it, you can build it yourself from a durable steel bar. The resulting metal circle is welded inside the pipe just above the blower. The construction of the furnace can be considered completed.
5. We make a cutout for pouring stones on the side (90 ° from the loading door and the blower). According to the above technology, we install the door.
6. Now you need to build a platform on which the stones will be laid. We will make it from metal rods. The dimensions of the cell are taken into account the size of the stones that we plan to fill up in the heater.
7. Now you can fill the stones. After that, cut a circle with a diameter of 0.7 meters from a metal sheet. We make a hole in it for the chimney, which should be closer to the far wall of our stove. We weld the pipe, and then weld the circle with a chimney on top of our stone bin. You can proceed to the manufacture of a water tank.
8. We weld a 0.7 meter long piece to our long piece of large pipe.
9. We make a hole under the tap in our water tank and fix it by welding.
10. Cut a circle with a diameter of 0.7 meters from the steel sheet, cut it into two unequal parts. In the larger we make a hole for the chimney. We fit this part over the entire structure by passing the chimney through the hole. We make a hole around the chimney.
11. It remains only to fix a smaller piece from the steel circle with the help of loops - water will be poured through this hatch. That's it, our homemade metal stove is ready!
 Water Tank Oven
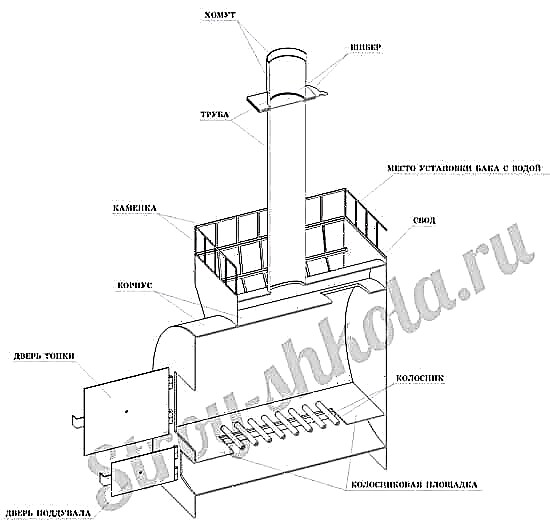 Horizontal furnace from the chimney
Having the skills of metal carving and welding, you can make a stove for a bath with your own hands in a fairly simple drawing. True, this will require some time and material costs, but the savings will be very substantial. And most importantly, such an oven will work no worse than a purchased one.
Fuel for sauna stoves
I distinguish between stoves and the type of fuel consumed:
- Due to their ease of use, many people prefer electric stoves. They are safe, in them the heating elements are hidden by special heat-insulating materials. As a rule, they are very compact, quickly and well heat up. You can install them yourself: you do not need to build smoke outlets, and the whole installation is reduced to the proper laying of electrical cables.
- Gas stoves have the advantage of low fuel consumption. Many are afraid of gas units, but in vain: all of them are equipped with a safety device, which, when the fire goes out, instantly shuts off the gas supply. It is easier to regulate the heating power in them, for this you just need to configure a special thermostat in accordance with your desire.
- Classic wood stoves are to the taste of most lovers of the bath. They are slower in heating, but they well maintain constant heat.Many people really like the smell that is released when burning wood or briquettes. You can build such a stove with a water tank yourself.
Important Tips
- To prevent heat from leaving the furnace capacity, an opening valve is installed on the edge of the chimney.
- The cause of the fire can be a huge accumulation of soot. For this, two holes are drilled in the pipe. Steel tubes are inserted into them with a turn in the direction of the pipe. This prevents the appearance of soot. The fuel will be completely burned out, and the accumulation of soot will be minimal.
- After the construction is completed, it must be checked for holes, gaps and cracks.
- There should not be any objects around the furnace that are subject to fire: synthetics, wood and fabric.
- All cut edges of pipes and metal sheets must be cleaned from sharp edges to avoid cuts. If there is no experience in the correct installation of the chimney, then it is better to contact specialists.
- The installation of this furnace should be done on a finished concrete foundation, its height is 250-300 mm. Brickwork with clay mortar in one or two rows is superimposed on it. A brick screen will protect the walls from overheating.
Vertical oven - step by step

- prepare the base - a pipe fragment up to approximately 0.9 meters,
- weld a circle from a metal sheet to the bottom of the pipe - it should be equal to the diameter of the pipe,
- cut a hole for the blower, its maximum width is not more than 0.2 meters,
- weld a round plate with a diameter along the pipe, cut out the middle and weld the rods into the hole - this will be the grate,
- decorate the furnace compartment by cutting a small rectangle above the grate and close it with a metal door,
- cut a hole above the firebox, weld the grate rods and hang the door,
- brew the case with a round piece of metal, do not forget about the holes for the chimney and blower,
- the traditional finale is consistent polishing of the entire body and painting.
To your aid - drawings and photos that will help you independently make a bath stove from a pipe in full compliance with all safety standards. By the way, do not forget to do the first warming up in the fresh air - this way you will avoid getting fumes from the paint you used in your airways. Indeed, many polymer compounds openly harm your health. Remember that an iron stove made of a pipe is best lined with brick. So it will be better to keep heat in the steam room, and the air will be protected from those substances that are released into it with heating of iron.


Types of designs
Metal stove for a bath
Home-made metal furnaces are divided into three main types in their design:
How do they differ from each other? In the first case, this is a simple model, the body of which is lined with refractory bricks on the outside and inside. Of course, this is an expensive option, so many people use ordinary red brick for cladding. By the way, the bricks are attached to the walls of the unit and between themselves with a special wire. In the middle of the furnace, a grate is installed inside, on which stones are laid.
The second option is simpler. To do this, the stove around the perimeter is finished with a metal grill so that between the walls of the device and the grill there remains a fairly impressive gap. Stones fall asleep into it.
The combined option is the most difficult. For this, a heater is placed on top of the boiler, for which an additional strong construction is being built. This complicates the unit and increases its cost. But it works much more efficiently by installing additional elements for the release of thermal energy.
Fuel types
There are only three product groups in this category:
- Electric stoves. Their package includes a metal case and a heater. The requirement is good insulation of the terminals and connection points.
- Gas. In addition to the casing, they include a burner that supplies fuel to the furnace.Experts recommend installing a security unit in the form of a simple automatic control system. For example, a temperature controller, a temperature sensor and a flame sensor. The latter is especially important - it will control the gas supply. When the flame is extinguished, he will give a command to the valve, which will block the gas pipe line.
- Wood burning. These are the simplest designs that do not use power supply networks. Incidentally, potbelly stoves also belong to them.
Materials
For the manufacture of a garage stove from a pipe, the following materials will be needed:
- The main pipe, preferably with a diameter of 500 millimeters or more, is 1.5 to 2 meters long,
- A pipe for attaching a chimney, 40 centimeters long and 150 to 200 millimeters in diameter,
- 4 to 5 mm thick metal sheet,
- A piece of metal with a width of 3 centimeters, for the side on the lid of the furnace,
- Channel or corners with a face of 50 - 70 millimeters,
- Grate for the grate, along the length of the pipe and the width equal to its diameter,
- Handles made of metal (for housing and lid) in the amount of 4 pieces.
Tools
A do-it-yourself stove from a 500 mm pipe for a garage can be assembled using tools and devices such as:
- Electric welding machine,
- Angle grinder or grinder,
- File set,
- Hacksaw,
- Hammer or sledgehammer
- Building level,
- Roulette,
- Marking tool - ruler, core, marker.
Do not forget about personal protective equipment: a welder's mask, gaiters, gloves, a protective suit with fire-retardant treatment.
Assembly procedure for the furnace unit
- Need to take the pipe. Cut four legs from the corners and weld them to the pipe. These will be the fulcrum of the future furnace.
- Two discs of the same diameter as the pipe are cut from a sheet of steel. These will be the front and back walls.
- On the front wall, a door is cut for filling fuel and a small hole for oxygen to access the combustion zone, without blowing out the fire will die out.
- A grate is inserted into the center of the pipe along its entire length and fixed by welding in the widest place - in the center of the diameter of the main pipe.
- The back and front walls are welded on the sides, hinges and the door itself should be fixed on the front wall to supply firewood or coal to the stove.
- At the back of the pipe, a hole is made from above for the chimney pipe, a flue pipe should be welded to this hole.
After finishing work, you need to install the furnace on a solid foundation, as an option, on four bricks. Next, connect the chimney to the pipe and test fire the stove. This is necessary in order to ensure the sealing of welds. 
It is worth remembering safety, any process of burning wood or coal is accompanied by the release of life-threatening, insidious and invisible gas - carbon monoxide, which does not have an odor. Therefore, issues of smoke removal should be treated with great responsibility.
Disadvantages

Like any device, a metal unit for a steam room has its drawbacks.
With all the indisputable advantages, metal products have several disadvantages:
- The unit cools quickly enough due to the low heat capacity of the metal, therefore, it needs constant heating during the bathing procedures, which leads to increased waste of firewood,
- Compared to brick counterparts, steel is more fire hazard, since the walls are very hot and radiate heat. In addition, touching such a wall can cause serious burns,
- Metal products are able to heat a smaller volume than massive brick stoves,
- Steel is susceptible to electrochemical corrosion, which reduces its durability and may require maintenance of weak points,
- A brick or stone stove for a bath looks much more solid and beautiful,
- Heat radiated by the stone is much more comfortable and healing than aggressive infrared radiation from a metal wall.
How to build a brick oven yourself
When planning the construction of a brick stove for a bathhouse with your own hands, you need to responsibly approach the issue of choosing the main material, on which the strength, reliability and productivity of the structure depend. Chamotte brick is known for its excellent heat-resistant characteristics, along with it red kiln and ceramic bricks are used, etc.
Work on the construction of a brick sauna stove begins, as a rule, with pouring the foundation, which can be of various types (stone, rubble, etc.). The classic option is a concrete base, which should be supplemented with waterproofing layers of roofing material or roofing felts.
Starting the laying of the furnace, it is important to constantly, in the process, check the horizontal rows for errors and the verticality of the corners of the structure for inaccuracies.
A brick heater can be made both open and closed, in any case it is painstaking work that must be performed strictly according to the ordinal instructions. On the second row of masonry, holes are formed for the installation of the blower, most often it overlaps on the fourth row and is fixed in the structure.
At the level of the blower door, grates will be installed in the stove, which rely on the bricks of the previously laid row. When laying fireclay bricks in the future, it is worth paying attention to the presence of holes for supplying secondary air. Next, the furnace is erected and the door is installed in it.
Further work is in full swing on the creation of a heater. After the chimney is equipped, a valve is installed. A water tank is installed, taps are regulated, etc.
The above types of bricks are used in masonry stoves at different stages regarding their physical properties, which we will discuss in more detail in the next chapter of the article.
How to calculate the material, make a drawing for making a brick oven yourself
So, as it turned out earlier, for work we need fireclay (heat-resistant) and ordinary bricks. It is not recommended to lay out the entire structure only from chamotte material, since such a furnace does not last for a long time and will collapse.
This type is best used for laying the internal environment of heating equipment. How to correctly and at what stages to alternate the brick should be indicated in the drawings.
For inexperienced masters, a huge number of already proven projects for creating this format of bath stoves are presented on the Internet.
Creating a drawing yourself, you should pay attention to such points:
- fire door should be located opposite the entrance to the bath room,
- the foundation for the furnace should be more than 20 cm high,
- When creating a design project, it is necessary to note the series that are erected without mortar.
Drawings from professionals posted on some construction sites imply the availability of ready-made numbers, calculations, the required amount of materials. In general, we can say that all expenditures for the construction of a brick furnace depend on its dimensions and the availability of additional equipment in it.
Continuous and periodic heating furnaces for a small bath
According to the principle of operation of the furnace for baths are divided into devices for continuous and periodic heating. Structures of the first type, as a rule, have thin walls and are suitable for loading a small amount of stones.
The temperature in such heaters reaches an indicator of 300 - 350 degrees.
Such stoves can be heated in various ways from electricity to liquid fuel, but gas is not used for the safety of users.
Batch devices, on the contrary, are characterized by thick masonry and the ability to use a large volume of stones. Such equipment has a high level of heat transfer.
For heating such stoves, firewood is most often used. In the lower section of the batch structures, the temperature reaches 1100 degrees.
Such indicators can completely destroy soot on the stones, so at the finish line they always remain clean.
At home, metal furnaces of constant heating are most often made, the heat pressure of such structures is enough to provide small family bathhouses. In addition, in recent years, more and more often assembled combined devices that allow you to increase the efficiency of heating equipment.
Choosing a place and installing a do-it-yourself bath stove
The exact place for installing the furnace in the bath must be determined at the design stage. For each building, this is an individual territory, but nevertheless there are nuances that are the same for everyone:
- you need to carefully study the location of the beams and roof overlap,
- all furnace parts must be insulated from wooden surfaces,
- the furnace should be close with air
- it is best to install a furnace between the dressing room and the steam room.
Before installing the furnace in the bath, the adjacent walls must be sheathed with a special protective material, such as asbestos cardboard. Do not forget about waterproofing and processing of metal structures with special tools that are resistant to high temperatures.
The distance from the wall to the heating equipment should be more than 26 cm. A properly placed stove in the bath should not interfere with visitors, while there should be maximum ventilation in the room and a chimney functionally equipped.