Everyone who wants to repair the apartment wants to make the perfect flooring, and new technologies contribute to this in many ways. All materials are now available and varied. These are numerous types of ceramic tiles, laminate, parquet, or self-leveling floor with a 3D effect.
But in addition to decorative properties, one should not forget about physical ones, for example, stepping on a cold tile after taking a hot bath is unpleasant. Therefore, the quality of the flooring lies not only in its beauty, but also in a comfortable temperature.
Types and principle of work
There are two main types of underfloor heating:
Water underfloor heating It is not common among apartment owners of ordinary multi-storey buildings, because such re-equipment of water supply systems in many areas of our country is prohibited by law. Most often, the installation of a water floor is recommended to be carried out in private homeswhere, undoubtedly, it will be the most profitable and safe for consumers. Pipes for such laying are used, as a rule, metal-plastic or polyethylene.
Electric underfloor heating is convenient for users in that, using it with a temperature regulator, you can save electricity and make its temperature as comfortable as possible for yourself.
Nowadays, a dual-zone controller is often used, which can control the temperature on different warm floors located in neighboring rooms.
The electric floor is represented by several varieties:
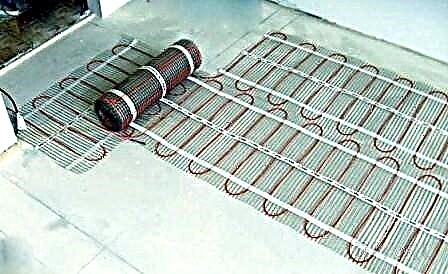
Cable floor heating
The most economical among electric underfloor heating. It is sold in construction stores in the form of skeins, placed by a snake on a special reinforcing mesh. Subsequently, it is poured with a concrete screed. Voltage is applied to the cable and it generates heat.
The heating resistive cable is of two types:
The most commonly used is the last, two-core. The reason for this is electromagnetic radiation, it comes from an electric single-core cable more than from a two-core cable. This is due to the fact that two conductive wires emit two vortex fields, which are at least partially compensated by each other. And since the influence of electromagnetic fields on the human body adversely affects its functioning, it turns out that two-core cable is safer for our health. The use of single-core mats is advisable outside the living room.
Heating mats
This is a nylon mesh with a width of 50 cm with a thin heating cable already attached to it with a small pitch (5-7 mm). This method of laying a warm floor was created specifically for rooms where it is not possible to fill a thick layer of concrete screed.
The thickness of the heating core is only 3 mm, which allows laying the floor both by the dry method (directly under the laminate) and wet (for example, in the adhesive layer of the tile). The price of heating mats is higher than a simple cable floor heating, but they also have more advantages: installation is simple and the mat heats up faster, because the cable is closer to the surface.
Film infrared floor
This is a thin flexible thermofilm, which consists of heating elements (carbon or bimetal) on the edges of which copper buses are located, and electric current flows along them. It features a completely dry installation and is laid under a laminate, carpet, parquet, tile. The heat generated by the infrared floor is distributed evenly, which is why it differs from simple electric underfloor heating based on a heating cable.
Wiring diagram
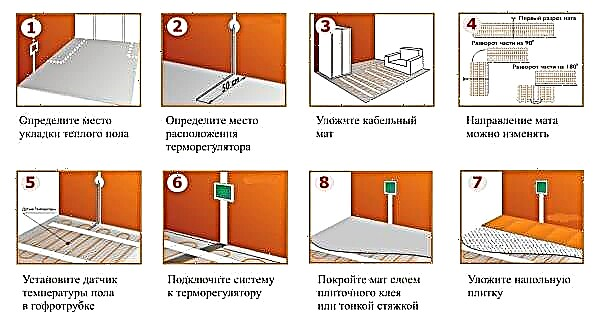
Installation and adjustment of an electric heat-insulated floor is a fairly simple task. The main thing is to correctly position the heating elements, connect the system to the thermostat and to the power source. Following the recommendations, you can do the installation of underfloor heating correctly without the help of specialists.
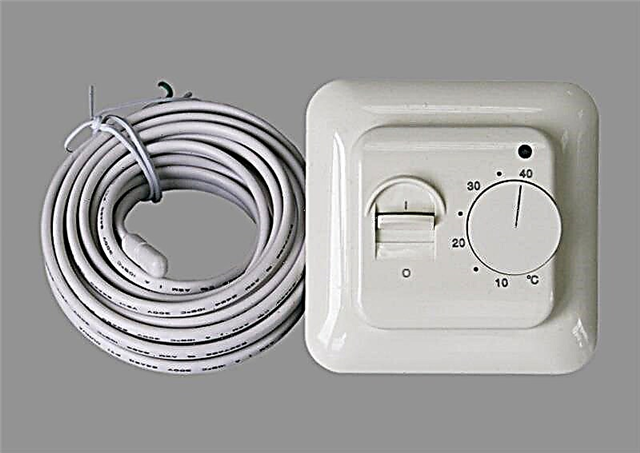
Regardless of the type of laid underfloor heating, it is necessary to prepare a thermostat. You need to connect it to the network, think about whether it will be powered by an electric panel or from an existing outlet. As a rule, thermostats already depict a connection diagram that facilitates the installation procedure. It is also necessary to gut the ditch in the wall. Thereafter, two corrugations will need to be carried out: in one of them there will be a temperature sensor, and in the other - power wires of the heating cable. Only after these events can you begin direct laying of the warm floor.
When connecting the cable floor, you need to bring the two ends of the power cable to the thermostat (the coupling is subsequently filled with a concrete screed).
The simplest and most effective way to lay the cable is a snake, but you can use any other method, avoiding the intersection of cables.
Next, you need to install a temperature sensor, it should be placed in a special plastic tube. It will be possible to check the cable underfloor heating for operability only after the concrete screed has completely dried. It is necessary to connect the wires supplying the entire system, the power wires for the heating cable, as well as the temperature sensor wire.
The principle of laying the heat mat is similar, you just need to correctly calculate the power per square meter. After laying the mat, it is poured with a thin layer of concrete screed or tile glue and a decorative coating is laid on top. Do not use thermal insulation, as it will lead to overheating. The coupler is also located inside the screed.
The layout of the infrared film floor differs from the previous ones only in the use of a special substrate based on foil film. It allows you to reflect infrared rays in the right direction.
Installation and setup
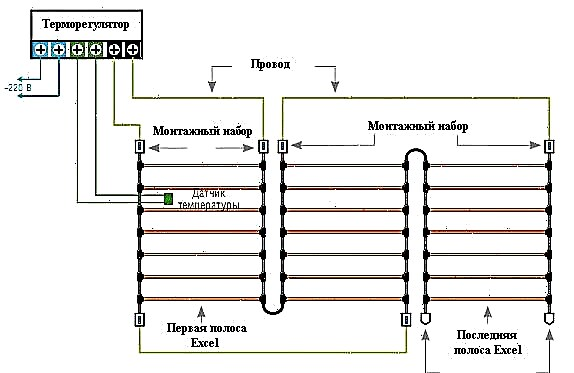
From the point of view of saving energy resources, installation of a water floor is the most efficient. All the pipes of closed systems are controlled by the so-called comb system (collector) of the warm floor. It is a distribution unit in which all pipes of closed heating systems converge.
The comb performs several functions at once:
- Reduces the temperature of the supplied water. The temperature of the warm floor should not exceed 45 degrees.
- Provides the necessary heat in the room, in each circuit controls the flow. For this purpose, flow meters are provided in the collector, they are responsible for the flow of water.
Installation of the cabinet with the collector is relative to the height of the final planned underfloor heating. It is recommended that the collector without a cabinet be placed at a height of at least 1 m from the floor level.
Also, often a three-way valve is required in the system to control the flow of water. It is its presence in the system that makes it possible to supply water of a stable temperature to the wiring of the warm floor. On the valve there is a thermostatic axle box, which allows to regulate the heating at the outlet. Water is mixed between the hot water coming from the boiler and the liquid coming back from the system, which gives maximum savings.
Thus, the circulation in the system is as follows:
- Hot water from the boiler enters the collector.
- Then it enters the three-way valve, if the water temperature is higher than desired, the valve opens for the flow of cooled water.
- Inside, mixing occurs until the temperature reaches the desired level.
- The valve closes.
As for the electric underfloor heating, in this case you will have to be puzzled by the choice of the thermostat and configure it correctly, they are:
- with manual or electronic control,
- with the possibility of programming and without it.
The simplest temperature controllers are mechanical, controlled by a rotary wheel. They have a significant drawback - increased energy consumption, because in this case it is easy to forget and leave the warm floor turned on.
Electronic temperature controllers are controlled by pressing buttons, the desired temperature and current temperature are displayed on the LCD screen.
Electronic programmable thermostats have the same appearance as simple electronic ones, but are supplemented with the function of turning the floor on and off at a certain time and even depending on the day of the week (weekday / weekend). The use of such devices is not only convenient, but also helps to save a considerable amount of electricity, if properly programmed.
The only problem for some users may be the difficulty of programming such a thermostat. For this, the manufacturers include quite detailed instructions for use, adjustment and configuration in the kit.
The electronic thermostat is connected according to the scheme indicated by the manufacturer on the housing. Near the terminals intended for this or that wire, there are instructions: two terminals for the floor temperature sensor, three for the power cable (phase, zero and ground) and two for the heating cable for the warmest floor (2 wires are used for two-wire, for single-wire, respectively , one).
When working with the installation of a temperature regulator, one should not forget about observing elementary safety rules:
- It is necessary to disconnect the room.
- The temperature mode of operation of the thermostat is from -5 to +40 degrees.
- Cleaning should be carried out without the use of corrosive chemicals.
- It is worth checking the operability of the thermostat only after the completion of work; you should not start if the device is disassembled.
Manufacturers rating
To date, the choice of underfloor heating systems in stores is quite extensive. In this regard, it can be difficult to choose from such a variety a truly high-quality product that meets all the requirements.
Therefore, it is necessary to consider the main manufacturers and compare the features of their products:
- "Devi" - A manufacturer from Denmark, representing cable underfloor heating. This brand has an indisputable plus: Devi service centers are found in almost all large cities of our country, so if you have any problems you can always call a repair specialist to help solve your problem. Warranty on underfloor heating of this manufacturer is 20 years, and the cost of their systems is often lower than that of competitors. Also, “Devi” also produces high-quality temperature controllers, so many people give the brand a well-deserved first place.
- Teplolux - A Russian manufacturer that has become a leader in the domestic market of underfloor heating in 2010. The manufacturer gives a guarantee of 25 years, the price of this product is very pleasant, and the range is quite wide. Teplolux produces both ultra-thin warm floors, and mobile, and many others designed to create comfortable conditions.
- "Energy" - A British manufacturer, initially established itself in the homeland, and subsequently in other countries of the world. Its advantage over other manufacturers is the environmental friendliness of materials. Also, Energy thermometers are considered to be one of the most economical both in cable power consumption and in the cost of the equipment itself. Manufacturer's warranty is 20 years.
- Nexans - The Norwegian company, famous all over the world, is famous for its innovative developments. One of them is the connection of a thermostat without couplings, which allows you to adjust the temperature in different rooms without any problems.
- Legrand - A world-class specialist, engaged in the production of various electrical and information systems, including temperature controllers for underfloor heating. In its assortment all types: from simple mechanical to complex programmable controllers. The Celiane series is represented by high-tech programmable systems that will satisfy the most demanding customer.
Masters Tips
There are nuances that must be considered when installing underfloor heating and connecting them to a thermostat.
- Carefully measure the area of the room and, accordingly, the length of the cable.
- Initially, it is better to create a plan for installing a warm floor system on paper, you may need it, for example, when moving in a room or any repair work.
- It is worth checking the resistance of the system before the cable is poured into the screed, a spread of up to 10% is within normal limits.
- It is better to carry out a performance check only after the screed has completely dried.
See how to connect the thermostat from the underfloor heating in the next video.
Features
The temperature regulator is designed to stabilize temperature indicators, automatically connect and disconnect heating devices. The appliance receives readings from a temperature sensor and automatically cuts off electrical power when the required temperature is reached. Even at this time, the appliance is active and continues to automatically adjust the temperature. With a decrease in temperature indicators, the regulator resumes its activity.
Types and principles of work
Thermostats of various heating mechanisms have different automatic control mechanisms.
For water floors:
- Two way valve.
- Three-way valve.
A feature of functioning is the physical restriction of the inlet of boiling water into the heating mechanism. This ensures the required volume of water of the desired temperature.
Varieties of temperature controllers:
- Digital. The feature of operation is similar to an electronic-mechanical thermostat. A distinctive feature is the ability to set the temperature in the electrode. The electromechanism is equipped with a touch panel where information is displayed.
- Electromechanical. It is a device whose operating principle is similar to the operation of an iron. Temperature control occurs due to the rotation of the wheel. A turn in one direction provides an increase in temperature, in the other - a decrease. It is possible to determine the temperature regime only by one's own intuition. The only plus of such a thermostat is its low price and ease of installation.
- Programmable. This type of device demonstrates smart electromechanism. Able to turn off and turn on the heating system at a given temperature. It is also possible to turn on the device at a set time. All temperature conditions are shown on the control panel.
By the number of control channels, the thermostat is:
- Dual-zone, which operates simultaneously in two sections of the heating system.
- Single-channel - processing of a special signal from one sensor.
By mounting method:
- Internal (built-in).
- External (remote, waybill).
At the moment, many varieties of underfloor heating with heating elements are produced, the most common among them are:
- Resistive cable. It happens two-core and single-core.
- Cable with self-adjusting function.
- Thermomat (represents a two-layer cloth, inside of which heating mechanisms are sealed).
- Film (infrared). The basic basis for such heating are carbon and carbon rods.
Connection diagram
The thermostat is mounted in a wall near a power outlet or switch. In the prepared funnel, a mounting box for the thermostat is installed in the wall, to which the electric wires (zero and phase) of the power supply and the temperature sensor are connected.Next, the thermostat is connected.
The temperature control mechanism has side sockets to which the mains wiring (220 V), a temperature sensor and a heating element are connected.
Important knowledge of wires by color:
- White is the L phase.
- Blue is N zero.
- Yellow-green wire - grounding.
Connection diagram:
- Electrical wires (voltage 220V) are connected to sockets 1 and 2. To 1, a blue wire is drawn, and to 2 is white.
- To the nests 3 and 4 are the wires of the heating electric cable: No. 3 - wire N, No. 4 - wire L.
- The temperature sensor wires are connected to pins 6 and 7, regardless of polarity.
- Functional check. To do this, connect the power supply, set the temperature mode to a minimum on the device and connect the heating element system (usually using a special knob or button). Next, set the maximum temperature. The correct operation of the thermostat will show itself with a click, which warns of an electrical circuit.
The connection diagrams are different and may differ, therefore, the manufacturers number all the electrical contacts for the correct connection.
Instructions for connecting a warm water floor:
- To begin with, the temperature sensor is mounted. It is recommended to install the temperature sensor close to the thermostat.
- In the design of the underfloor heating assembly of the servo drive. This electromechanism is designed to automatically adjust the water pressure passing into the contours.
- Connect the existing electrical wires in a single circuit.
- Set the heating elements of the mechanism.
- At the end of the installation, you must connect to the network and check the functionality of the entire system. Within 90-120 minutes, take temperature measurements with an ordinary thermometer in the area of the sensor. The indicator of proper operation is the complete exclusion of deviations in the readings.
In this case, the thermostat controls the temperature of the air, and not the heating of the coating.
Connection of a temperature regulator to a two-core cable. The two-wire cable system under the protective layer consists of two live wires. It is convenient to install in that the connection is made using a single wire, unlike a single-core electrical cable.
The connection diagram shows that 3 wires are in contact in a two-wire electric cable: brown and blue are current-carrying, yellow-green are grounding. The phase is connected to the 3 connector, zero is connected to the electrical contact 4 (blue), grounding (green) to pin 5.
Connection of a single-core cable. The design of a single-core cable consists of one current-carrying electric wire (white). The second green wiring is for grounding the PE shield. White wires are connected to the electrical contacts of the thermostat No. 3 and No. 4, and green is connected to No. 5.
Connecting warm mats is almost no different from the process for cable heating.
Let us dwell only on the differences:
- To install the temperature sensor on the surface of the mat is a recess. The design is connected to the network using copper conductors located at the edges of the heating mats.
- There is a possibility of cutting the film coating along the contours. On the wrong side, the films of the electric wires are insulated, and on the front side they are left open for connection to the electric wires. Film strips are stacked parallel to each other and are interconnected.
How to connect with your own hands?
To properly connect the thermostat to the warm floor with your own hands, you must strictly follow the installation recommendations:
- Put the mounting box in the prepared pocket and connect the power cable.
- A temperature sensor must be brought out into the opening of the installation cup.
- Route the electrical wires to turn on the three-way valve or heating cables.
- Using the instructions of the thermal device, connect the load and the temperature device.
- Next, the power cable is connected to the input terminals of the thermostat.
- Power is supplied and heating is turned on. To control the heating of the floor, a temperature regime of 26-28 degrees is set. If the sensor is located in the wall, a temperature of 20-22 degrees is used.
After all installation work, it is necessary to test the systems for functioning. Areas with uneven heating are disconnected from the network and tested for resistance. Detected malfunctions eliminate and restore the functioning of the underfloor heating system. The correctness of the installed system is determined upon obtaining the necessary climate at several stages of switching on / off the heating elements.
Regulation of temperature of a water heat-insulated floor
The most common way to connect a water heating mechanism is through a collector. The ends of two pipes are brought to the mechanism: one on the feed comb, the second on the return. A heat carrier of identical temperature enters each circuit. This method is not very practical, because it is necessary to determine the air temperature according to your own feelings.
To simplify the work at the inlet, flow meters are installed that help to correct the temperature norm. In this case, control is also performed manually. Thermostats are designed for automatic control of the device, and servos play the role of the performer.
For a large heating area and an extensive heating network, it is better to install thermostats with servos. Servo drives are located in each perimeter on the comb of auto-supply of coolant. The role of the servo drive is to automatically submit an order to reduce and add coolant volume. Thermostats are located in each separate room where there is this type of heating. They are interconnected with servos, which are supplied with special control signals.
Regulators check both the temperature of the flooring and the temperature of the climate, and are also equipped with a programming function. It is necessary to control and regulate the temperature if such a floor is used as the main source of heating. They make models that track 2 factors at a time. In this case, the primary information is data on the state of airspace, and the floor temperature is represented by a secondary indicator.
The underfloor heating controller functions as follows: on the mechanism panel, the desired temperature can be programmed. If there is a mismatch even by 1 degree in either direction, a signal is applied to the servomotors, through which the flow of coolant increases or decreases. Some time later, the temperature position comes into a normalized state.
Automated control of temperature indicators greatly simplifies the control of water structures. Manual adjustment of the comb and mechanical valves is not necessary in this case.
Installing a temperature sensor for a warm water floor. Electric sensors are mainly located inside the thermostat.
Instructions for mounting the thermostat:
- No other sources of heating should be in the vicinity.
- Direct sunlight is strictly prohibited.
- Installation of the thermostat is possible at a height of 100-150 cm from the floor covering.
Temperature meters are mostly external. This electromechanism is fixed on the edge of a long cable. This appliance must be installed in the floor, the required gap between the wall and the appliance is at least 50 cm. It is placed at the same distance from nearby pipes with a coolant. The other end is connected to the regulator and connected to the corresponding electrical terminals.
The installation of the thermal device must be carried out before filling the screed. For further replacement, it must be laid in a corrugated sleeve. The edge of the corrugated sleeve, which is located in the screed, must be insulated. The other edge fits into the groove on the wall and fits onto the thermostat box. This installation is quite time-consuming, but it allows you to easily replace a faulty sensor.
Manufacturers
Among the most popular companies specializing in products of this kind, the following can be distinguished:
- Firm "Teplolux" very famous today due to the high quality of its products. There is a possibility of the simplest installation of the system and manual regulation of the mechanism. The only negative of this brand is the high cost of materials.
- If you focus on the optimal ratio of price and quality, then the world-famous brand Grand Meyer will be a great example.
- Energy temperature controllers have gained great popularity due to its design, which has an LCD display. These electrical appliances function perfectly with various underfloor heating, thereby saving costs.
Professional Tips
Electrical work must be carried out in accordance with safety regulations. If you ignore these rules, there is a big risk of adverse effects.
Recommendations:
- Electrical work is carried out only in a de-energized room. If it is possible to disconnect the necessary line, it is better to disconnect it from the power supply.
- Connecting the device is possible only in the assembled design.
- The thermostat must be kept clean.
- Exceeding power and current from parameters specified by the manufacturer is strictly prohibited.
- Under no circumstances should the controller be repaired without special skills.
- If you have old wiring, it will be safer to install a separate line for connecting a warm floor, which is specialized in automation.
- The best option for temperature control is to install separate thermostats in each room.
See how to connect a warm floor in the next video.
How does the thermostat work?
The temperature regulator is used to maintain a stable temperature in the "warm" system, as well as to turn on and off the heating mats (film). The device "reads" the temperature sensor and automatically turns off the power as soon as the floor is heated to the required limit. At the same time, he remains in working mode and continues to monitor the situation. If the sensor notifies you of deviations in the temperature regime, the thermostat will again run electricity into the system and the floor will begin to heat up.
The most popular and reliable thermostats are mechanical and conventional electronic. More complex - electronic programmable. Despite the significant difference in its "stuffing", the principle of connecting thermostats is very similar.

Installation and connection of the thermostat
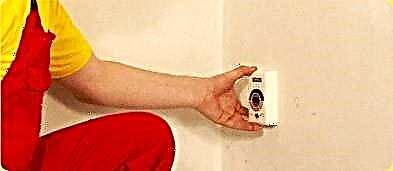
The thermostat is usually mounted on the wall, like a conventional switch. For him, a place is chosen near the existing electrical wiring, for example, near an outlet. First, a recess is made in the wall, a thermostat mounting box is installed there, wires (phase and zero) of the supply network and the temperature sensor are connected to it. The next step is to connect the thermostat.
On the side of the thermostat are "nests". The wires of the network (220V), the sensor and the heating cable are brought here.
It is useful to know that the wires that are connected when installing the thermostat are color-coded:
- white (black, brown) wire - L phase,
- blue wire - N zero,
- yellow-green wire is earth.
Connecting a warm floor to electricity is performed in the following order:
- To the "sockets" 1 and 2 connect network wires with a voltage of 220V. Strictly observe the polarity: wire L (phase) is connected to pin 1, wire N (zero) to pin 2.
- On the contacts 3 and 4, the heating floor heating cable is started according to the principle: 3 contact - wire N (zero), 4 contact - wire L (phase).
- The wires of the temperature sensor (usually built into the floor, that is, determining the temperature in the thickness of the floor) are connected to the "sockets" 6 and 7. The principles of polarity are not necessary here.
- Check the health of the thermostat. To do this, turn on the -220V power supply, set the minimum temperature on the device and turn on the heating element system (by turning the knob or pressing a button). After that, the heating mode is changed to the maximum, that is, the thermostat is “programmed” to the highest temperature that is possible for it. The correct operation of the device will be announced by a click, which will indicate the closure of the heating circuit.
Wiring diagrams may vary slightly, depending on the types and models of thermostats. Therefore, so that the user does not make a mistake, as a rule, all contacts are registered on the device body.

Small differences in the connection dictate the features of heating cables of the warm floor. According to their structure and number of cores, they are divided into single-core and two-core. Accordingly, in the schemes of their connection there are some nuances.
Connection to the thermostat of a two-wire cable
The twin-core heating cable has two conductive conductors under the protective sheath. This type of cable is more convenient than a single-core design, since it is connected to the thermostat only from one end. Consider a typical wiring diagram:

We see that in one two-core cable 3 wires are adjacent: 2 of them are current-carrying (brown and blue), 1 - grounding (yellow-green). Brown wire (phase) is connected to pin 3, blue (zero) to pin 4, and green (ground) to pin 5.
The kit for the thermostat, the circuit of which we just examined, does not include the ground terminal. With a ground terminal, installation is much simpler.

Single cable connection
In a single-core cable there is only one current-carrying conductor, usually it is white. The second wire - green - is the grounding of the PE screen. The connection diagram may be as follows:

White wires (both ends of the single-core cable) are connected to the contacts of the thermostat 3 and 4, and green ground wire to pin 5.
Video example of installation work
As you can see, connecting a thermostat is one of the easiest stages of building a warm floor. It is not necessary to have seven spans in the forehead in order to deal with the simplest diagram drawn on the device body and to fulfill all the manufacturer's recommendations. The only difficulty may be ensuring personal safety when working with electricity. Follow the installation instructions and remember that work on connecting the thermostat must be carried out with the machine turned off (circuit breaker).
The need for thermal control of the floor
Thermoregulation in the heating system "warm floor" plays the main role. With the help of a temperature regulator, a stable temperature regime in the system is maintained, heating elements are turned on and off. The device recognizes the temperature sensor and automatically de-energizes the system when it warms up to the desired limit. At the same time, the device continues to maintain an operating mode, controlling the situation.
As soon as the sensor receives a signal about a decrease in temperature, the temperature regulator activates the system again by supplying electricity. The flooring will start to warm up again. The most popular are reliable mechanical and simple electronic devices. More complex electronic programmable thermostats are considered. But differences in design features do not have a special effect on the connection scheme of the warm floor to the thermostat and the mains.
Varieties of temperature controllers for underfloor heating
So, in order for the floor heating system to function efficiently and with a good economic indicator, it should be properly managed.For this purpose, experts advise to mandatory connect the underfloor heating not only to the mains, but also to the thermostat using any type of device.
How to connect a warm floor to a thermostat
Installation and commissioning of hidden heating systems is a fairly simple process, if we are not talking about water structures. Electric heating circuits are suitable for rooms of any configuration and purpose, and unlike more complex water systems, there are practically no restrictions on their use.
Installation and arrangement of such a heating element consists in laying the coolant itself and connecting it to a power source. This is not a difficult job that does not require special knowledge and colossal experience, but if the installation of the source itself does not cause many problems, not everyone knows how to connect a warm floor to a thermostat.
- Types of electrical systems
- What is the principle of thermostats?
- Connect thermostats
- How to connect cable floor?
- Thermomat connection
- Network connection of film construction
Types of electrical systems
This option of hidden heating is the most common among people who want to create comfortable temperature conditions in their home. Despite the fact that the electric floors operate from the same power source, they differ in the heating element. To find out how to connect a warm floor to a thermostat, you need to clarify what type of heating system you are dealing with.
So, among the whole variety of heat sources, the most common ones can be distinguished:
- cable with the property of self-regulation of thermal mode,
- resistive one or two core heating cable,
- thermomats - a thin, rolled material in which the heat source is sealed in several layers of a special cloth,
- a film, which can be based on carbon, bimetallic coolant fibers, as well as carbon rods.
For each of these types of electric floor, its own individual wiring and connection scheme is developed. When arranging thermal cable elements, it is necessary to correctly calculate the installation step, which will eliminate excessive heat generation or uneven heating of the floor covering.

So, what types of electric floors are there, we have already found out, now let's figure out how the temperature controller works.
VIDEO: How to connect a warm floor to a thermostat
What is the principle of thermostats
This device, as mentioned above, is used to maintain a stable temperature in the hidden heating system. Also, through the thermostat, an on / off cycle of the operation of thermal elements is carried out. How does he do this?

So, during pouring the screed, the sensor is laid, which will read its thermal data from the floor surface. Further, when the cement base is completely dry and the decorative coating is laid, the underfloor heating should be correctly connected to the thermostat. As a rule, it is placed in a wall ceiling, according to the principle of sockets and switches. But if the latter are installed, according to European standards, at 80 cm from the flooring, then the regulator should be convenient to use. Most qualified professionals recommend placing the thermostat at eye level, which will ensure its comfortable use and protect against unnecessary actions of young children.

So, back to the principle of operation of this device. The temperature sensor, located in the screed, “transmits” the heating data to the autoregulator, which, when the specified temperature is reached, shuts down the heating system. At the same time, the device itself remains in operation and continues to monitor the situation. When the device detects deviations in the temperature of the concrete base and the one set by the program, it again launches electricity into the system and the floor starts to warm up again.
Today the market of this segment offers a huge number of regulators, among which mechanical and conventional electronic models are the most popular and reliable. More complex are electronic thermostats with a function for programming the on / off cycle, as well as other additional properties. Despite the significant difference in their "stuffing", and, accordingly, in cost, the principle of their connection to the network is almost identical.
Connect thermostats
Before connecting the warm floor to the thermostat, you need to decide using which method you will connect. Creatures two options:
- Stationary power supply from the main meter.
- Using an outlet.
Many models in their configuration already have a scheme, thanks to which the procedure for commissioning the device will not cause difficulties. And if you are even a little versed in electrics, then most likely you will be able to independently carry out this procedure without resorting to the help of specialists.

After you have installed the thermostat for the underfloor heating in the place you need, you need to bring the phase, grounding and zero to the distribution box. Now let's prepare the place for the output of wires from the data meter. In the wall ceiling, we will ditch a small groove in which two plastic tubes for wires should fit - the power wire of the heat source and the connection of the internal sensor. Based on this, you should understand that the connection of the underfloor heating controller is carried out before the finishing work, otherwise you will simply spoil the finished, beautiful walls and you will have to do their improvement again.
As soon as a number of these activities are completed, you can proceed with the installation and connection of the electric underfloor heating.
How to connect cable floor?
Before starting laying the cable, it is necessary to stretch the power wires to the thermostat, while the heating element itself and the wires passing to the regulator are connected by a special coupling, which will later be located in the screed.

The next step will be laying directly the cable. There are many schemes that help create uniform heating of the floor plane, but whichever you choose, it is important to remember that the cable lines should never intersect.
Next is the installation of the sensor, which is placed in a suitable-sized plastic pipe. And, before pouring the screed, you need to make sure that the laid heat source is working, using a special tester for this. After this device showed resistance identical to the passport data, you can proceed to pouring the concrete base.
The bonded underfloor heating is connected to the thermostat only after the base has completely solidified.
Thermomat connection
Connecting this heating system to the thermostat is not so difficult, especially since the process is almost identical to the previous version. Therefore, it makes sense to point out only the differences.
Due to the fact that in this case there is no need for a concrete screed, an additional opening in the floor surface will be required to place the sensor. As soon as the mats and the data meter are located, you need to fix them by applying a thin adhesive base. That’s the whole difference.
VIDEO: Installation of underfloor heating based on heating mats
Network connection of film construction
At the edges of the film heating web are copper rods, which are connected to the network. The temperature regulator is connected to the film variety according to the same scheme as the thermomat device. The difference lies in the use of a special substrate, which is laid out over the entire insulated surface, which is a foil cloth.
VIDEO: Warm film floor wiring instructions 220 watts
Design and purpose of the sensor
If you decide to equip electric floors, you just need to connect a sensor to them, which will measure the temperature of the floor heating. It consists of 2 wires, which are fixed to each other by a thermocouple. This element is able to change the resistance depending on what temperature the film is heated to.
Sensors can indicate the temperature of a warm floor or air in a room.
Connecting the sensor and cable of the warm floor to the electric network (click to enlarge)
In the second case, the sensor can be located directly in the thermostat housing. However, note that before choosing the presented item, be sure to consider the presence of additional heating facilities in the room. If there are batteries in the room, then it is better to give preference to the sensor that measures the temperature of the warm floor. In this case, his indicators will be as accurate as possible.
Some features of laying IR film
Correctly you need to connect not only the regulator. The laying of the film itself is important. It has certain features:
- It is not worth it to cover the heating elements with skirting boards, furniture or any decorative materials.
- It is best to position the panels along the length of the room. Thanks to this arrangement, you can significantly reduce the number of points to which the film will connect.
- The heating elements must not be laid too close to the power lines. The minimum distance between them is usually about 5 cm.
- If other heating devices are present in the room, then they are located at a distance of at least 20 cm from infrared heating elements.
Connection of a warm floor to electricity
Modern homes are increasingly equipped with underfloor heating. After all, the availability of this heating method increases with constant high efficiency. Despite the simplicity of the construction of underfloor heating, they can be called the best option for heating a house or its additional heating.
Connection of a warm floor to electricity
Underfloor heating in its design can be of two main types: water and electric. Let's consider how the electric heat-insulated floor works and is connected.
The principle of action of warm electric floors is simple: they convert electrical energy into heat due to the resistance of conductors. In this case, the screed or tile is heated. It is these materials that are able to evenly distribute heat throughout the area and give it to the environment.
Consecutive connection of a core heat-insulated floor
Electric heated floors have a fairly simple structure and consist of the following main parts:
- heating element (depending on the type, there may be a cable or mat),
- temperature sensor,
- temperature regulator.

The structure of the floor, heated with electric cables
Many people think that it is difficult to lay a warm floor and connect it to electricity. In fact, in essence, this type of underfloor heating resembles conventional wiring, which is laid in screed layers or under tiles. For a full-fledged operation, an ordinary outlet is enough, where there is an alternating current of 220 V.
The connection scheme itself does not cause any difficulties - it does not even require special knowledge. But it is imperative to remember during work that this is an electric current, which, if handled improperly, can seriously harm a person, including death. To prevent this from happening, you must definitely observe a number of rules when choosing and connecting.
Selection of power underfloor heating
Calculation of underfloor heating
The most important indicator that you need to focus on when choosing warm floors is their power. This criterion depends on the following points:
- floor area to be heated,
- type of heating needed (additional or main),
- type of premises where heating will be carried out (balcony, living room, office, warehouse).
The type of network connection and the presence of additional elements depend on the power.

Calculation of the power of the warm floor
When calculating the warm floor, you need to take only the usable area where the person is most often located. So, if this is a kitchen, then under the furniture and a refrigerator you can not calculate the area. When carrying out calculations, it is necessary to determine in advance the location of all the heating elements, since in the future it will be impossible to change their positions.
If you decide to use a warm floor as a basic heating, then the area allocated for it should be at least 70% of the entire room.
Specific power of warm floors and its calculation

Advantages of Uriel Thermostats
Warm floors can be used both as the main source of heat in the house, and as a heater. For the first type, the calculation is taken approximately 150-170 watts per 1 sq.m. The heating is calculated based on the values of 110-130 W per 1 sq.m.
This indicator may vary slightly depending on the type of space being heated. For example, rooms where people are constantly must have a very warm floor, and for this reason, the estimated power consumption rises. If it’s a kitchen or a bathroom, then here you can’t overestimate the values, as residents spend little time in them.
Underfloor electricity consumption can be controlled
Additionally, when calculating, it is recommended to take into account the number of storeys. If the floor of the apartment on the ground floor is insulated, then the capacity must be increased by 10-15%. In all higher rooms, you can not increase the value.
Types of electric heat-insulated floors and temperature regulators
Now there are two types of electric floor heating:
- cable or sectional
- mats, infrared film systems.

Cable floor heating
Each of these species has its own characteristics and is used in specific cases. So, if the heated floor is mounted in a concrete screed, then it is better to use a cable type. Mats or film heating elements are best suited for tiles.
Naturally, the main part of the warm floor is the heating element itself. But it works fully thanks to the temperature regulator, which is the heart of the system.
Thermostat for underfloor heating is a device that, without human intervention, automatically regulates and maintains optimal air temperature
It allows you to maintain the desired surface temperature. It is not a problem to purchase a thermostat: it can be either mechanical, with manual adjustment and temperature control, or fully automatic, with measurement of surface temperature, indoor air and selection of the most optimal parameters.

Thermostat for underfloor heating Electrolux ETT-16 Thermotronic Touch
Connecting the temperature controller to the system

Installation diagrams of a film heat-insulated floor
Before you connect a warm floor, regardless of its type, you need to determine the location of the thermostat. This device is used to maintain a stable set temperature indoors. In addition, by means of a temperature regulator, a warm floor is directly connected to the network.
Installation of the thermostat is best done near existing wiring
Installation of the thermostat is carried out at a height of at least 1.5 meters from the floor and in places where it will be fully protected from high temperatures. This will allow you to accurately measure and set the desired floor heating.
Before connecting the thermostat, you first need to decide what method this will be done: washing from the shield or using a power outlet.It is immediately worth noting that these two methods involve an additional inclusion in the circuit of a circuit breaker that will operate in the event of breakdowns, overheating, or short circuit. Its ultimate power off is selected depending on the type of floor heating.
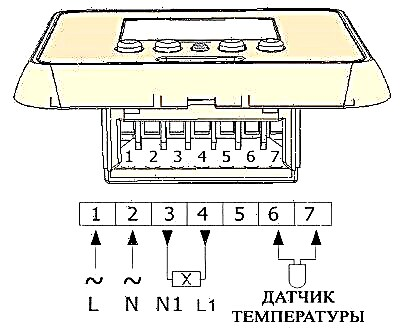
In most cases, the connection diagram is indicated on the thermostat, which greatly simplifies installation without the help of electricians. If the circuit is missing, then the following wires must be connected to the following terminals:
- 1 terminal - network phase,
- 2 terminals - network zero,
- 3, 4 terminals - cores of the heating element,
- 5 terminal - timer
- 6, 7 terminals - floor temperature sensor.
This distribution is standard, but it is worth understanding that different manufacturers can create circuits that require a different connection. It all depends on the design and additional features of the system.

We prepare a place for the installation of a thermostat: we supply power to it (hidden or open, if desired)
Before connecting, you need to dig a small ditch in the wall. Two plastic tubes will be placed in it. In one, the wires of the heating element will be passed through in the future, and in the second there will be a temperature sensor. At the end of these activities, you can proceed with the installation and connection of the entire underfloor heating system.
Cable floor heating system connection

Cable floor heating connection diagram
To connect a cable underfloor heating, it is necessary to level the surface. Next, attach a damping tape along the wall and then lay the insulation. Installation of the cable can also be carried out on an old surface, without lining. The only condition for this is the presence of a heated room below. Before laying the cable, you need to stretch all the wires to connect to the thermostat.
Next, you can lay the heating element by first placing the usual mounting tape on the floor. This is done so that the cable is held in position and does not move. You can lay the cable in any shape, the main thing is that it does not intersect with itself. The most effective and convenient installation method is the so-called “snake” - cables are sold in rolls, already laid in the form of a coil on a grid.

Wiring diagrams for single-core and two-core cable for underfloor heating
Evenly distributing the cable, you can fix it. It is important that the edges do not reach the location of the furniture or walls of about 10 cm. Next, you need to lay the temperature sensor, which is hidden in the tube mentioned earlier. Its location should be at a distance of 40-50 cm from the edge of the coil of the heating element.
This completes the installation of the cable and sensor. Using a tester, you need to check the resistance of the heating element. It must comply with the passport data. Next, you need to fill everything with a screed and wait until it hardens. Immediately turn on the warm floor to dry it is impossible, as there will be cracks and the strength index will significantly decrease. It remains just to connect all the wires to the thermostat and check the system.
Connecting floor heating in mats
To understand how to connect a warm floor in mats, you do not need to have a lot of knowledge and experience. The basic principle is about the same as that of the cable view. It is only worth noting some differences.
A thermal mat is a heat-resistant film on which a heating element is mounted. Since the step and form of laying is already set during production, you will only need to calculate the heated area and power consumption.
Electric floor in mats
When installing such heating, the mats need to be laid out on the surface, according to the calculated area. Then everything is poured with a thin concrete screed or glue is applied to lay the tiles. A very important point is the lack of thermal insulation. This can lead to overheating of the system and its failure.
If the length of the cold leads is not enough to connect, just use a piece of mat. The coupling must be placed inside the screed itself.
Connection to an electric circuit of a heat-insulated floor of a film type
Warm floor film type is a relatively new invention. It is made of a special heating film. Connecting this system can cause problems even for the most experienced builders. In order to do this without problems, it is imperative to deal with the very system of film underfloor heating.
The sequence of work when laying an electric floor heating
The film underfloor heating system consists of special carbon and bimetal heating elements, which are sealed in a special heat-resistant material. At the edges of the film are copper contacts. With their help, the device connects to the network.
Actually, the connection is carried out by soldering the wires to the terminals and outputting them to the thermostat. A styling feature is the use of a substrate that has a foil surface. This solution allows you to reflect heat from the bottom surface and completely direct it to floor heating.
The temperature sensor is installed, as a rule, in a special depression under the film itself, but variants of its location on the surface are not ruled out. Also, this type can be cut according to special marks that are applied by the manufacturer. They are located at a distance of 30 cm from each other. When the installation is completed, you can connect the sheets in parallel.
The main difference between a film warm floor is that it fits any surface. The only exception is its installation under the carpet, as there is a high probability of damage to the integrity of the film.
The decision to make the house a warm floor was always justified. It is convenient, practical and quite economical. And if there are children in the house, the warm floor will allow parents not to worry that they will freeze and become sick.
General connection principles
When installing a system of underfloor heating of any electric type, you should first determine in which place to install the thermostat. He will control the entire system, maintain the desired temperature and connect the heating devices to the mains. Devices with built-in sensors that record the temperature in the room are mounted on the wall at a height of at least one and a half meters from the floor. The place for the device must be removed or protected from heat sources.
Before connecting the thermostat and the subsequent installation of the electric underfloor heating, it is necessary to determine how this will be done. There is a possibility of stationary connection from an electric panel, or a conventional outlet is used to turn on.
Many models of thermoregulatory devices on their bodies have circuits that help to connect a warm floor to a thermostat. With their presence, the installation process is simplified, all work can be done on their own, without involving electricians.
Scheme of connecting a warm floor to a thermostat
After installing the thermostat on the junction box, phase, zero and ground are displayed. A groove is inserted into the wall, into which plastic tubes are placed. In one, the power wire of the heating cable is located, in the other, the wiring of the sensor located under the floor covering. As soon as all the work is completed, it is allowed to proceed to the installation of heating, acting in accordance with the scheme for connecting the warm floor to the thermostat.
By the way, video with the thermostat connection sequence can be easily found on the Internet today.
Cable floor
To begin with, the surface is leveled, after which a damper tape is strengthened along the walls, a heat-insulating layer is laid. The cable may also be installed on the rough floor, but only if the room located on the floor below is heated. Before laying the cable, power wiring is extended to the thermostat box. As a result, the coupler should be inside the concrete screed.
Cable floor
A thermal floor is mounted, which is connected according to a certain scheme: a mounting tape is located on the draft floor or the insulating layer. It is necessary for fixing the cable. The most convenient way to use the device is the “snake”. Here, one important condition must be observed - the line is laid in such a way as to exclude the intersection of cables.
Fasteners for the mounting tape allow you to place the conductor evenly. As soon as the cable laying is completed, a sensor mounted in a tube of plastic material is mounted. The final stage of all work is checking the quality of their performance. Using a tester, you need to make sure that the cable resistance indicator is fully consistent with the values stated in the passport. Everything is ready, you can proceed to the screed device.
Before connecting the underfloor heating system to electricity, make sure that the screed is completely hardened. As soon as the floor covering has gained sufficient hardness, the wires of the heating elements and the sensor are connected to the electrical wiring that feeds the entire system, everything is displayed on the thermostat and fixed with screw clamps. This stage is considered the most difficult, and it is recommended to entrust it to professional masters. Otherwise, it would be better if before completing this work step you find on the Internet a video with a plot connecting a warm floor to a thermostat.
Thermal mats
The connection diagram of such an electric floor heating system to a thermostat is nothing complicated. The principle of installation is similar to laying cable heating. So just talk about the differences that will arise at the time of the work.
As you know, thermal mats are represented by thin heating cables fixed on a heat-resistant film. Since the installation step has already been determined, it remains to clarify the area over which the system should be placed, after calculating the indicator of its specific power.
Until the film is heated, the film with the cable attached to it is laid out on the concrete surface, a thin screed is applied or a layer of tile glue is applied, covered with the material selected for finishing the surface. The heat-insulating layer in this case is not applied, because it can cause overheating of the entire system.
The thickness of the entire structure does not exceed one and a half centimeters, so that under the placement of the sensor will have to provide a recess in the floor.
Since the heat mat is a type of heating cable, mounting these two systems is almost the same. The difference is that the mats are mounted quickly and easily. The absence of the need to install a heat-insulating layer and a thin screed create a certain benefit. The cost of such a floor will be lower due to a decrease in the need for materials and working volumes. Another plus - the system is better suited for rooms with restrictions on increasing the thickness of the floor.
Film floors
This is a relatively new type of underfloor heating, for the manufacture of which a heating film is used. Before connecting such a system, it is recommended to study its device. The composition includes heating elements sealed in a thin heat-resistant material. A copper conductor runs along the edge of the film material, which must be connected to the mains.
They connect the film floor according to the standard scheme for connecting warm mats. The difference is that a special substrate is applied, spread out over the entire surface. Its role is played by a material having a foil surface capable of reflecting infrared radiation, directing it to a heated room.
Film underfloor heating
The sensor is placed in a plastic tube in a specially prepared recess. There is an option for mounting this device on the surface of the film itself.
When connecting an infrared warm floor to a thermostat, the film is allowed to be cut into pieces. Cuts are made along special lines marked by the manufacturer. They are applied in increments of 20-30 cm. The current-conducting strips are insulated from only one edge, the second remains in the open state, because in this place the floor IR system is connected to the power wiring.
Film sheets are laid out, connected to each other in a parallel manner. In conclusion, one pair of wiring is connected to an adjacent sheet, and with the help of the second, an infrared thermal floor is connected to the thermostat.
A feature of such a warm floor is that it is suitable for almost all types of coatings, among which the laminate is popular. It is not recommended to lay a carpet on top, as the likelihood of damage to the film material from the pressure created on the floor increases.
Common Connection Errors
Typical designs may vary slightly, depending on the model and type of thermostat. In order to prevent errors during installation, each contact is registered on the body of the device.
Small differences in the connection can be dictated by the features of the cables of the heating system. By the structure and number of cores, they are single-core and two-core, which creates nuances when connected.
A cable for two wires under its sheath has a pair of current-carrying conductors. This type is considered more convenient than with one core, because it is connected to the thermostat from one end.
The connection diagram looks like this: in a two-core cable there are three wires. Current flows through the brown and blue wires, yellow-green acts as a ground. Leads of brown and blue shades are brought to the contact, green is let on the ground.
Let's see how the single-core cable of the underfloor heating system is connected to the thermostat. In this case, a white wire is considered a current conductor. The second (green) is used for the grounding device.
The connection scheme for a single-core cable of a warm floor to a temperature controller is as follows: white wires are supplied to two adjacent contacts of the thermostat - two ends of a single-core cable. The third is the green ground wire.
You are convinced that connecting the thermostat is easy. The schemes are simple, do not require special skills. It is necessary to precisely follow the manufacturer's recommendations and observe during operation the requirements of safety rules when working with electrical equipment. The main condition that must be strictly observed is the disconnection before connecting the circuit breaker.